Laravel7 Vue.jsを使用してSPAを実装する手順

Laravel7でVue.jsを利用して、SPAを実装するまでの手順を記述してます。
環境
- OS CentOS Linux release 8.0.1905 (Core)
- Composer 1.10.5
- PHP 7.4.5
- Percona Server Ver 8.0.19-10
- Laravel Framework 7.6.2
Laravelアプリケーション作成
任意の場所で、プロジェクトを作成します 。
ここではlaravel-testという名称で作成してます。
laravel new laravel-test初期設定
.envファイル設定
環境に合わせて Percona Server との接続情報を設定しておきます。
DB_CONNECTION=mysql
DB_HOST=127.0.0.1
DB_PORT=3306
DB_DATABASE=laravel
DB_USERNAME=root → ユーザー名を変更
DB_PASSWORD= → パスワードを記述
日本語環境設定
configフォルダ配下の「app.php」のtimezoneとlocalを変更しておきます。
'timezone' => 'Asis/Tokyo',

'locale' => 'ja',
Vue環境構築
公式パッケージのインストールを実行します。
composer require laravel/uivue環境を構築します。
php artisan ui vueパッケージのインストールとコンパイルを行います。
npm install && npm run devビルドの自動化をしておきます。
※下記を実行しないとソースコードを変更する度に、上記コマンドを実行する必要があります。
npm run watchモデル作成
下記のコマンドを実行して、モデルとマイグレーションファイルを一緒に作成します。
php artisan make:model Task -m「app/Task.php」が生成されていると思いますので、下記の通りに編集します。
$fillableに指定したカラムはホワイトリストとなり、create()やfill()、update()で値の代入が可能となります。
<?php

namespace App;

use Illuminate\Database\Eloquent\Model;

class Task extends Model
{
    protected $fillable = [
        'subject',
        'description',
        'complete_date',
        'completed',
    ];
}
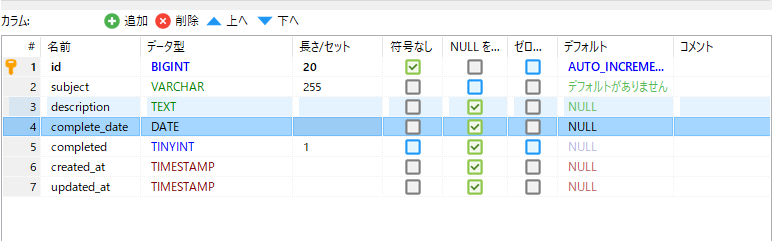
テーブル作成
モデル作成時に生成された「database/migrations/xxxx_xx_xx_xxxxxx_create_tasks_table.php」を下記の通りに編集して、マイグレーションを実行して、テーブルを作成します。
<?php

use Illuminate\Database\Migrations\Migration;
use Illuminate\Database\Schema\Blueprint;
use Illuminate\Support\Facades\Schema;

class CreateTasksTable extends Migration
{
    /**
     * Run the migrations.
     *
     * @return void
     */
    public function up()
    {
        Schema::create('tasks', function (Blueprint $table) {
            $table->bigIncrements('id');
            $table->string('subject');
            $table->text('description')->nullable();
            $table->date('complete_date')->nullable();
            $table->boolean('completed');
            $table->timestamps();
        });
    }

    /**
     * Reverse the migrations.
     *
     * @return void
     */
    public function down()
    {
        Schema::dropIfExists('tasks');
    }
}
マイグレーションを実行します。
php artisan migrateテーブル「tasks」が作成されて、カラムも作成されます。
APIコントローラー作成
次にAPI用のコントローラーを作成します。
–apiで、 必要なメソッドを自動生成してくれます 。
php artisan make:controller TaskController --apiapp/Http/Controllers/TaskController.phpが作成されるので、下記の通りに編集しておきます。
コード内の「use App/Http/Requests/StoreTask;」はバリデーションで、次の工程で実装します。
また「$this->middleware(‘JpJsonResponse’);」は日本語文字化け対策で、別の工程で実装します。
<?php

namespace App\Http\Controllers;
use App\Task;
use App\Http\Requests\StoreTask;
use Illuminate\Http\Request;

class TaskController extends Controller
{

    public function __construct()
    {
        $this->middleware('JpJsonResponse');
    }
    /**
     * Display a listing of the resource.
     *
     * @return \Illuminate\Http\Response
     */
    public function index()
    {
        $tasks = Task::all();
        return $tasks;
    }

    /**
     * Store a newly created resource in storage.
     *
     * @param  \Illuminate\Http\Request  $request
     * @return \Illuminate\Http\Response
     */
    public function store(StoreTask $request)
    {
        Task::create($request->all());
    }

    /**
     * Display the specified resource.
     *
     * @param  int  $id
     * @return \Illuminate\Http\Response
     */
    public function show($id)
    {
        $tasks = Task::find($id);
        return $tasks;
    }

    /**
     * Update the specified resource in storage.
     *
     * @param  \Illuminate\Http\Request  $request
     * @param  int  $id
     * @return \Illuminate\Http\Response
     */
    public function update(StoreTask $request, $id)
    {
        $update = [
            'subject' => $request->subject,
            'description' => $request->description,
            'completed' => $request->completed,
            'complete_date' => $request->complete_date,
        ];
        Task::where('id', $id)->update($update);
    }

    /**
     * Remove the specified resource from storage.
     *
     * @param  int  $id
     * @return \Illuminate\Http\Response
     */
    public function destroy($id)
    {
        Task::where('id', $id)->delete();
    }
}
バリデーション作成
バリデーションを行うためFormRequestクラスを作成します。。
php artisan make:request StoreTaskapp/Http/Requests/StoreTask.phpを下記の通りに編集します。
<?php

namespace App\Http\Requests;

use Illuminate\Foundation\Http\FormRequest;

class StoreTask extends FormRequest
{
    /**
     * Determine if the user is authorized to make this request.
     *
     * @return bool
     */
    public function authorize()
    {
        return true;
    }

    /**
     * Get the validation rules that apply to the request.
     *
     * @return array
     */
    public function rules()
    {
        return [
            'subject' => 'required|max:10',
            'description' => 'required|max:100',
            'completed' => 'required|max:1',
        ];
    }
}
日本語文字化け対策
Middlewareを利用して、エンコードのオプションに「 JSON_UNESCAPED_UNICODE 」を追加してresponseデータを処理します。
middlewareを作成します。
php artisan make:middleware JpJsonResponseapp/Http/Middleware/JpJsonResponse.phpを下記の通りに編集します。
<?php

namespace App\Http\Middleware;

use Closure;
use Symfony\Component\HttpFoundation\JsonResponse;
class JpJsonResponse
{
    /**
     * Handle an incoming request.
     *
     * @param  \Illuminate\Http\Request  $request
     * @param  \Closure  $next
     * @return mixed
     */
    public function handle($request, Closure $next)
    {
        $response = $next($request);

        //JSONでない場合はそのまま
        if (!$response instanceof JsonResponse) {
            return $response;
        }

        // Unicodeエスケープさせないようにオプションを追加
        $response->setEncodingOptions($response->getEncodingOptions() | JSON_UNESCAPED_UNICODE);

        return $response;
    }
}
作成したmiddlewareをKernelに追加します。
app/Http配下にある「Kernel.php」に下記を追加します。
protected $routeMiddleware = [
        'auth' => \App\Http\Middleware\Authenticate::class,
        'auth.basic' => \Illuminate\Auth\Middleware\AuthenticateWithBasicAuth::class,
        'bindings' => \Illuminate\Routing\Middleware\SubstituteBindings::class,
        'cache.headers' => \Illuminate\Http\Middleware\SetCacheHeaders::class,
        'can' => \Illuminate\Auth\Middleware\Authorize::class,
        'guest' => \App\Http\Middleware\RedirectIfAuthenticated::class,
        'password.confirm' => \Illuminate\Auth\Middleware\RequirePassword::class,
        'signed' => \Illuminate\Routing\Middleware\ValidateSignature::class,
        'throttle' => \Illuminate\Routing\Middleware\ThrottleRequests::class,
        'verified' => \Illuminate\Auth\Middleware\EnsureEmailIsVerified::class,
        //追加します
        'JpJsonResponse' => \App\Http\Middleware\JpJsonResponse::class,
    ];
SPA用コントローラー作成
SPAを実装するためのコントローラーを作成しておきます。
php artisan make:controller TaskMainController.phpapp/Http/Controllers/TaskMainController.phpが作成されるので、下記の通りに編集しておきます。
<?php

namespace App\Http\Controllers;

use Illuminate\Http\Request;

class TaskMainController extends Controller
{
    public function index()
    {
        return view('task.index');
    }
}
共通レイアウト作成
今回はSPAなので必要ないと思いますが、共通のレイアウトを作成しておきます。
resources/views/layout.blade.php を下記の内容で作成しておきます。
<!DOCTYPE html>
<html lang="{{ str_replace('_', '-', app()->getLocale()) }}">
    <head>
        <meta charset="utf-8">
        <meta name="viewport" content="width=device-width, initial-scale=1">

        <title>Laravel</title>

        <!-- Fonts -->
        <link href="https://fonts.googleapis.com/css?family=Nunito:200,600" rel="stylesheet">
        <!-- bootstrap -->
        <link href="https://stackpath.bootstrapcdn.com/bootstrap/4.3.1/css/bootstrap.min.css" rel="stylesheet">

        <!-- Styles -->
        <style>
            html, body {
                background-color: #fff;
                color: #636b6f;
                font-family: 'Nunito', sans-serif;
                font-weight: 200;
                height: 100vh;
                margin: 0;
            }

            .full-height {
                height: 100vh;
            }

            .flex-center {
                align-items: center;
                display: flex;
                justify-content: center;
            }

            .position-ref {
                position: relative;
            }

            .top-right {
                position: absolute;
                right: 10px;
                top: 18px;
            }

            .content {
                text-align: center;
            }

            .title {
                font-size: 84px;
            }

            .links > a {
                color: #636b6f;
                padding: 0 25px;
                font-size: 13px;
                font-weight: 600;
                letter-spacing: .1rem;
                text-decoration: none;
                text-transform: uppercase;
            }

            .m-b-md {
                margin-bottom: 30px;
            }
        </style>
    </head>
    <body>
        <div class="flex-center position-ref full-height">

            <div class="content">
                <div class="title m-b-md">
                    mebee
                </div>

                <div>
                    @yield('content')
                </div>
            </div>
        </div>
    </body>
</html>
ビュー作成
ビューを作成します。resources/views/にtaskディレクトリを作成し、index.blade.phpを下記の内容で編集します。
@extends('layout')
@section('content')
    <div id="app">
        <task-component></task-component>
    </div>
    <script src="{{ mix('js/app.js') }}"></script>
@endsection
コンポーネント作成
APIの処理を行うvue.jsのコンポーネントを作成します。
resources/js/components配下に「TaskComponent.vue」を下記の内容で作成します。
ここでは、APIの処理にaxiosを使用してます。
<template>
    <div>
        <!-- 新規追加 -->
        <div class="form-group">
            <label>案件名</label><input type="text" v-model="subject" class="form-control"/>
            <label>内容</label><input type="text" v-model="description" class="form-control"/>
            <button @click="addtask" class="btn btn-primary">追加</button>
        </div>

        <!-- task一覧表示 -->
        <div>
            <ul class="list-group list-group-flush">
                <li class="list-group-item d-flex justify-content-between align-items-center" v-for="task in tasks" :key="task.id">
                    <span class="badge badge-primary badge-pill">ID:{{ task.id }}</span>{{ task.subject }}
                </li>
            </ul>
        </div>
    </div>
</template>

<script>
export default {
    data() {
        return {
            message: "",
            tasks: {},
            subject: "",
            description: "",
            completed: "",
        };
    },
    created: function() {
        this.gettask();
    },
    methods: {
        gettask() {
            axios
                .get("/api/tasks/")
                .then(response => {
                    this.tasks = response.data;
                })
                .catch(err => {
                    console.log(err);
                });
        },
        addtask() {
            axios
                .post("/api/tasks/", {
                    subject: this.subject,
                    description: this.description,
                    completed: 1
                })
                // API通信成功
                .then(response => {
                    //task一覧を取得
                    this.gettask();
                    this.subject = "";
                    this.description = "";
                    this.completed = "";
                    this.message = "";
                })
                .catch(err => {
                    console.log(err);
                });
        }
    }
};
</script>
App.js編集
作成したコンポーネントを利用するためresources/js配下の「app.js」に下記を追加します。
Vue.component('task-component', require('./components/TaskComponent.vue').default);ルーティング追加
エンドポイントを設定するため、ルーティングを記述します。
routes/api.phpに下記を追加します。
設定すると「 /api/tasks/ 」がエンドポイントとなります。
Route::apiResource('/tasks', 'TaskController');ルーティングは下記のコマンドで確認できます。
php artisan route:list

<出力結果>
+--------+-----------+------------------+---------------+-------------------------------------------------+--------------+
| Domain | Method    | URI              | Name          | Action                                          | Middleware   |
+--------+-----------+------------------+---------------+-------------------------------------------------+--------------+
|        | GET|HEAD  | /                |               | Closure                                         | web          |
|        | GET|HEAD  | api/tasks        | tasks.index   | App\Http\Controllers\TaskController@index       | api          |
|        | POST      | api/tasks        | tasks.store   | App\Http\Controllers\TaskController@store       | api          |
|        | GET|HEAD  | api/tasks/{task} | tasks.show    | App\Http\Controllers\TaskController@show        | api          |
|        | PUT|PATCH | api/tasks/{task} | tasks.update  | App\Http\Controllers\TaskController@update      | api          |
|        | DELETE    | api/tasks/{task} | tasks.destroy | App\Http\Controllers\TaskController@destroy     | api          |
|        | GET|HEAD  | api/user         |               | Closure                                         | api,auth:api |
+--------+-----------+------------------+---------------+-------------------------------------------------+--------------+
次にroutes/web.phpに下記を追加します。こちらのURLがSPAのページとなります。
Route::get('/task', 'TaskMainController@index');実行します。
php artisan serve --host 0.0.0.0ブラウザから http://プライベートIP:8000/task にアクセスするとSPAが実装され、新しいタスクを追加すると表示されることが確認できます。
-
前の記事

CentOs8 caddy2.0をインストールする 2020.07.07
-
次の記事
Nuxt.js ライブラリ「vue-horizontal-list」をインストールしてタッチ対応な水平スクローラーを実装する 2020.07.08