Laravel7 フォームリクエストクラスを使用してバリデーション機能を実装する。
Laravel7でフォームリクエストクラスを使用してバリデーションを実装する手順を記述してます。
環境
- OS windows10 pro 64bit
- Composer 1.10.5
- PHP 7.4.5
- MariaDB 10.4.12
- Laravel Framework 7.6.2
※windows10に Laravel のインストールはこちら
※windows10に Composer のインストールはこちら
※windows10に PHP のインストールはこちら
※windows10に MariaDB のインストールはこちら
bootstrap導入
レイアウトにbootstrapを利用しているので、下記のコマンドで利用可能にします。
※ 詳しい手順はこちらに記述してます
composer require laravel/ui
php artisan ui bootstrap
npm install && npm run dev
フォームリクエストクラス生成
下記のコマンドでフォームリクエストクラスを作成します。
※ここではHogeRequestという名前で作成してます。
php artisan make:request HogeRequestapp\Http\Requestsに「HogeRequest.php」が作成されているので、下記のようにバリデーションを追加して、独自メッセージも作成します。
<?php

namespace App\Http\Requests;

use Illuminate\Foundation\Http\FormRequest;

class HogeRequest extends FormRequest
{
    /**
     * Determine if the user is authorized to make this request.
     *
     * @return bool
     */
    public function authorize()
    {
        return true;
    }

    /**
     * Get the validation rules that apply to the request.
     *
     * @return array
     */
    public function rules()
    {
        return [
            //required(必須)|min:2(最小2)|max:10(最大10)
            'name'=>'required|min:2|max:10'
        ];
    }

    public function messages()
    {
        return [
            //エラーメッセージ設定
            'name.required' => '名前は必須項目です',
            'name.min' => '名前は1文字以上を入力してください',
            'name.max' => '名前は10文字以下を入力してください',
        ];
    }
}
入力フォーム用コントローラー作成
まずはテスト用の入力フォームを作成していきます。
「NameController」という名前でコントローラーを作成します。
php artisan make:controller NameControllerapp/Http/Controllers/ NameController.phpが生成されているので、
formメソッドとHogeRequestを使用して、バリデーションと確認用のshowメソッドを作成します。
<?php

namespace App\Http\Controllers;

use Illuminate\Http\Request;
//HogeRequestを利用
use App\Http\Requests\HogeRequest;

class NameController extends Controller
{
    public function form() {
		return view('name.form');
    }

    //HogeRequestを利用
    public function show(HogeRequest $request) {
    // validatorを作成
		$validatedData = $request->validated();

		$name = array(
			'name' => $request->input('name'),
        );

		return view('name.show', $name);
	}
}
入力フォーム用ビュー作成
次にレイアウト部であるviewを作成します。
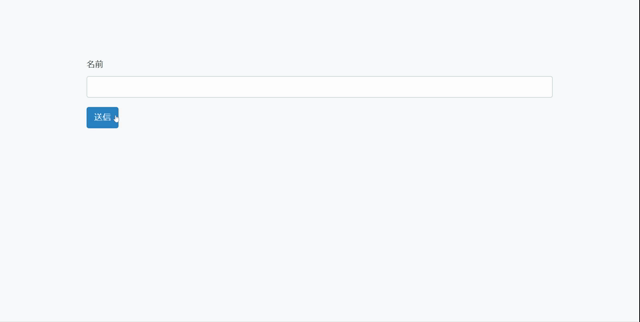
resources\views内で「name」というフォルダを作成して「form.blade.php」を下記の内容で、新たに作成します。
<!doctype html>
<html lang="{{ str_replace('_', '-', app()->getLocale()) }}">
<head>
    <meta charset="utf-8">
    <meta name="viewport" content="width=device-width, initial-scale=1">
    <title>入力フォーム</title>
    <link href="https://fonts.googleapis.com/css?family=Nunito:200,600" rel="stylesheet">
    <link href="{{ asset('css/app.css') }}" rel="stylesheet">
</head>
<body>
    <div class="mx-auto" style="margin-top: 100px; width: 800px;">
  @if ($errors->any())
  <div class="alert alert-danger">
      <ul>
          @foreach ($errors->all() as $error)
          <li>{{ $error }}</li>
          @endforeach
        </ul>
    </div>
        @endif
        <form method="POST" action="/name/show">
            @csrf
            <div class="form-group">
                <label>名前</label>
                <input type="text" class="form-control" name="name" value="{{ old('name') }}">
            </div>
            <input type="submit"  class="btn btn-primary mb-2" value="送信">
        </form>
    </div>
</body>
</html>
@csrf は Bladeテンプレート機能の1つで、CSRF対策となります。
下記のコードがerrorメッセージを表示する箇所となります。
@if ($errors->any())
<div class="alert alert-danger">
    <ul>
        @foreach ($errors->all() as $error)
        <li>{{ $error }}</li>
        @endforeach
    </ul>
</div>
oldは、入力エラー時の値を取得することができます。
{{ old('name') }}次に resources\views\name内でリクエストデータ取得用の「show.blade.php」を下記の内容で、新たに作成します。
<!doctype html>
<html lang="{{ str_replace('_', '-', app()->getLocale()) }}">
<head>
    <meta charset="utf-8">
    <meta name="viewport" content="width=device-width, initial-scale=1">
    <title>入力フォーム表示</title>
    <link href="https://fonts.googleapis.com/css?family=Nunito:200,600" rel="stylesheet">
    <link href="{{ asset('css/app.css') }}" rel="stylesheet">
</head>
<body>
    <div class="mx-auto" style="margin-top: 100px; width: 800px;">
        <div class="form-group">
            <label>名前 {{ $name }}</label>
        </div>
    </div>
</body>
</html>
ルーティング追加
アクセスするURLを設定するため、ルーティングを記述します。
ここでは/nameに設定します。
Route::get('/name', 'NameController@form');
Route::post('/name/show', 'NameController@show');
確認
ブラウザから http://localhost:8000/name にアクセスしてみて、バリデーションと作成したエラーメッセージが有効になっていることが確認できます。
-
前の記事
CentOs8 zabbix5をインストールする手順 2020.05.20
-
次の記事

docker コンテナ内でファイルが編集できない 2020.05.21