Laravel7 CRUD (作成・読み込み・編集・削除) 機能があるタスクリストを実装する手順

Laravel7でCRUD (Create・Read・Update・Delete) 機能を実装して、タスクリストアプリケーションを作成するまで手順を記述してます。
環境
- OS windows10 pro 64bit
- Composer 1.10.5
- PHP 7.4.5
- MariaDB 10.4.12
- Laravel Framework 7.6.2
※windows10に Laravel のインストールはこちら
※windows10に Composer のインストールはこちら
※windows10に PHP のインストールはこちら
※windows10に MariaDB のインストールはこちら
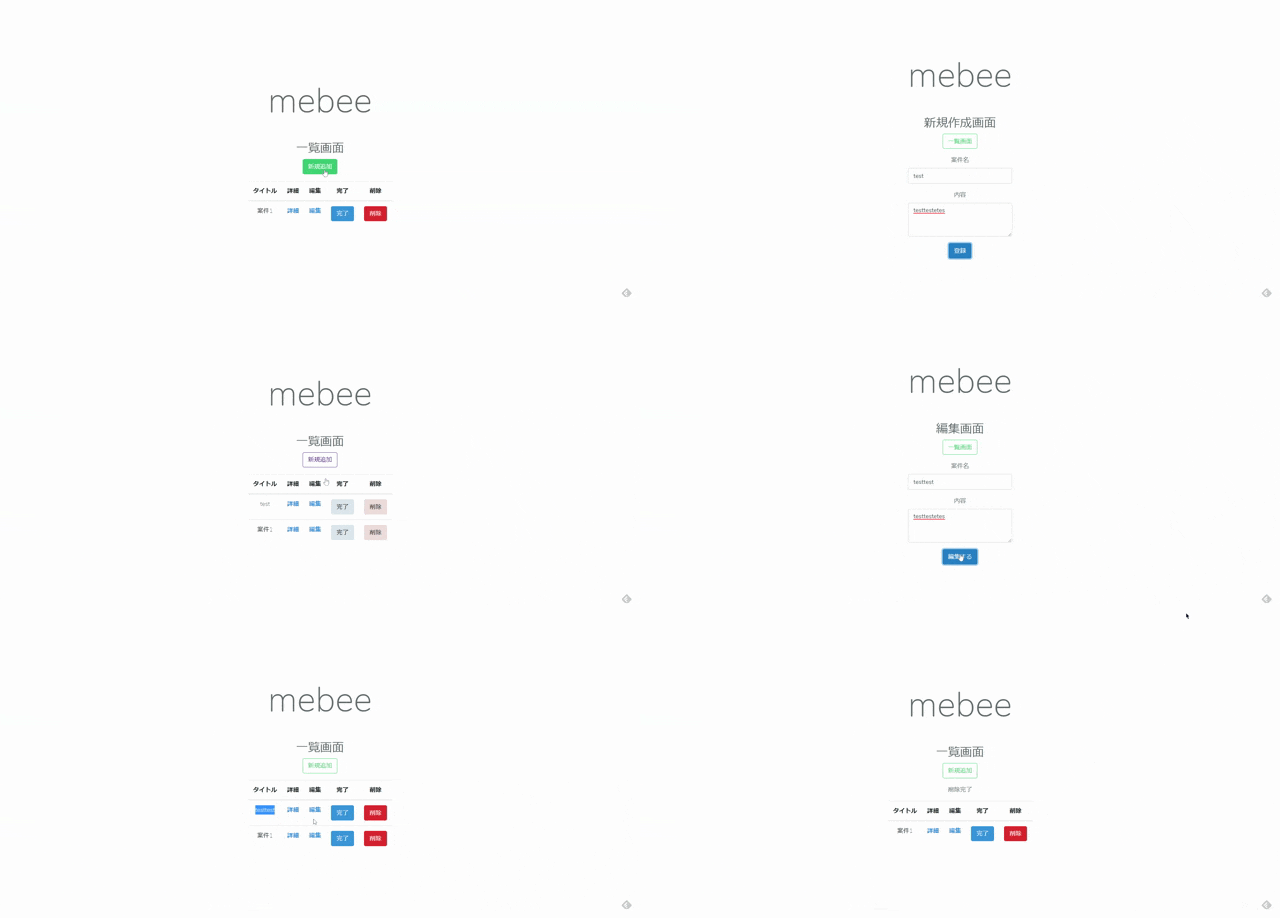
完成イメージ

Laravelアプリケーション作成
任意の場所で、プロジェクトを作成します 。
ここではsampleという名称で作成してます。
laravel new sample初期設定
.envファイル設定
環境に合わせてMariaDBとの接続情報を設定しておきます。
DB_CONNECTION=mysql
DB_HOST=127.0.0.1
DB_PORT=3306
DB_DATABASE=laravel
DB_USERNAME=root → ユーザー名を変更
DB_PASSWORD= → パスワードを記述
日本語環境設定
configフォルダ配下の「app.php」のtimezoneとlocalを変更しておきます。
'timezone' => 'Asis/Tokyo',

'locale' => 'ja',
bootstrap導入
レイアウトにbootstrapを利用するので、詳しい手順はこちらに記述してますが、下記のコマンドを実行して利用可能にしておきます。
※sampleプロジェクト配下で実行して下さい
composer require laravel/ui
php artisan ui bootstrap
npm install && npm run dev
モデル作成
下記のコマンドを実行して、モデルとマイグレーションファイルを作成します。
php artisan make:model Task -m「sample\app\Task.php」が作成されるので、下記の通りに編集します。
$fillableに指定したカラムはホワイトリストとなり、create()やfill()、update()で値の代入が可能となります。
※$fillableと$guardedの使い方はこちら
<?php

namespace App;

use Illuminate\Database\Eloquent\Model;

class Task extends Model
{
    protected $fillable = [
        'subject',
        'description',
        'complete_date',
        'completed',
    ];
}
テーブル作成
モデル作成時に生成された「sample\database\migrations\xxxx_xx_xx_xxxxxx_create_tasks_table.php」を下記の通りに編集して、テーブルを作成します。
<?php

use Illuminate\Database\Migrations\Migration;
use Illuminate\Database\Schema\Blueprint;
use Illuminate\Support\Facades\Schema;

class CreateTasksTable extends Migration
{
    /**
     * Run the migrations.
     *
     * @return void
     */
    public function up()
    {
        Schema::create('tasks', function (Blueprint $table) {
            $table->bigIncrements('id');
            $table->string('subject');
            $table->text('description')->nullable();
            $table->date('complete_date')->nullable();
            $table->boolean('completed');
            $table->timestamps();
        });
    }

    /**
     * Reverse the migrations.
     *
     * @return void
     */
    public function down()
    {
        Schema::dropIfExists('tasks');
    }
}
マイグレーションを実行します。
php artisan migrateテーブル「tasks」が作成されて、カラムも作成されます。

共通レイアウト作成
「sample\resources\views\layout.blade.php」を作成して共通レイアウトとして利用します。
※welcome.blade.phpをベースに作成してます。
<!DOCTYPE html>
<html lang="{{ str_replace('_', '-', app()->getLocale()) }}">
    <head>
        <meta charset="utf-8">
        <meta name="viewport" content="width=device-width, initial-scale=1">

        <title>Laravel</title>

        <!-- Fonts -->
        <link href="https://fonts.googleapis.com/css?family=Nunito:200,600" rel="stylesheet">
        <!-- bootstrap -->
        <link href="{{ asset('css/app.css') }}" rel="stylesheet">

        <!-- Styles -->
        <style>
            html, body {
                background-color: #fff;
                color: #636b6f;
                font-family: 'Nunito', sans-serif;
                font-weight: 200;
                height: 100vh;
                margin: 0;
            }

            .full-height {
                height: 100vh;
            }

            .flex-center {
                align-items: center;
                display: flex;
                justify-content: center;
            }

            .position-ref {
                position: relative;
            }

            .top-right {
                position: absolute;
                right: 10px;
                top: 18px;
            }

            .content {
                text-align: center;
            }

            .title {
                font-size: 84px;
            }

            .links > a {
                color: #636b6f;
                padding: 0 25px;
                font-size: 13px;
                font-weight: 600;
                letter-spacing: .1rem;
                text-decoration: none;
                text-transform: uppercase;
            }

            .m-b-md {
                margin-bottom: 30px;
            }
        </style>
    </head>
    <body>
        <div class="flex-center position-ref full-height">

            <div class="content">
                <div class="title m-b-md">
                    mebee
                </div>

                <div>
                    @yield('content')
                </div>
            </div>
        </div>
    </body>
</html>
コントローラー作成
次にコントローラーを作成します。
–resourceで、 CRUDに必要なメソッドを自動生成してくれます 。
php artisan make:controller TaskController --resourceapp\Http\Controllers\TaskController.phpが作成されるので、下記の通りに編集しておきます。
<?php

namespace App\Http\Controllers;

use App\Task;
use App\Http\Requests\StoreTask;
use Illuminate\Http\Request;

class TaskController extends Controller
{
    /**
     * Display a listing of the resource.
     *
     * @return \Illuminate\Http\Response
     */
    public function index()
    {
        $tasks = Task::all()->sortByDesc("id");
        return view('task.index', compact('tasks'));
    }

    /**
     * Show the form for creating a new resource.
     *
     * @return \Illuminate\Http\Response
     */
    public function create()
    {
        return view('task.create');
    }

    /**
     * Store a newly created resource in storage.
     *
     * @param  \Illuminate\Http\Request  $request
     * @return \Illuminate\Http\Response
     */
    public function store(StoreTask $request)
    {
        Task::create($request->all());
        return redirect()->route('task.index')->with('success', '新規登録完了');
    }

    /**
     * Display the specified resource.
     *
     * @param  int  $id
     * @return \Illuminate\Http\Response
     */
    public function show($id)
    {
        $task = Task::find($id);
        return view('task.show', compact('task'));
    }

    /**
     * Show the form for editing the specified resource.
     *
     * @param  int  $id
     * @return \Illuminate\Http\Response
     */
    public function edit($id)
    {
        $task = Task::find($id);
        return view('task.edit', compact('task'));
    }

    /**
     * Update the specified resource in storage.
     *
     * @param  \Illuminate\Http\Request  $request
     * @return \Illuminate\Http\Response
     */
    public function update(StoreTask $request, $id)
    {
        $update = [
            'subject' => $request->subject,
            'description' => $request->description,
            'completed' => $request->completed,
            'complete_date' => $request->complete_date,
        ];
        Task::where('id', $id)->update($update);
        return back()->with('success', '編集完了');
    }

    /**
     * Remove the specified resource from storage.
     *
     * @param  int  $id
     * @return \Illuminate\Http\Response
     */
    public function destroy($id)
    {
        Task::where('id', $id)->delete();
        return redirect()->route('task.index')->with('success', '削除完了');
    }
}
バリデーション作成
ここでは、必須項目の確認だけ行います。まずは下記のコマンドで、フォームリクエスト用のクラスを作成します。
php artisan make:request StoreTaskapp\Http\Requests\StoreTask.phpを下記の通りに編集します。
<?php

namespace App\Http\Requests;

use Illuminate\Foundation\Http\FormRequest;

class StoreTask extends FormRequest
{
    /**
     * Determine if the user is authorized to make this request.
     *
     * @return bool
     */
    public function authorize()
    {
        return true;
    }

    /**
     * Get the validation rules that apply to the request.
     *
     * @return array
     */
    public function rules()
    {
        return [
            'subject' => 'required',
            'description' => 'required',
        ];
    }

    public function messages()
    {
        return [
            'subject.required' => '案件名を入力して下さい。',
            'description.required' => '内容を入力して下さい。',
        ];
    }
}
ルーティング追加
アクセスするURLを設定するため、ルーティングを記述します。
「’only’ =>」を利用すると、ルーティングを制限することが可能です。
routes\web.phpに下記を追加します。
※resource使用時のメソッドとURIの対応表はこちら
Route::resource('/task', 'TaskController', ['only' => ['index', 'create', 'edit', 'show', 'update', 'destroy', 'store']]);ビュー作成
次にレイアウト部であるviewを作成します。
タスク一覧画面作成
resources\views内で「task」というフォルダを作成して、タスク一覧画面となる「index.blade.php」を下記の内容で、新たに作成します。
@extends('layout')

@section('content')
    <h2>一覧画面</h2>
    <p><a href="{{ route('task.create') }}" class="btn btn-outline-success">新規追加</a></p>

    @if ($message = Session::get('success'))
    <p>{{ $message }}</p>
    @endif

    <table class="table">
        <thead>
            <tr>
                <th>タイトル</th>
                <th>詳細</th>
                <th>編集</th>
                <th>完了</th>
                <th>削除</th>
            </tr>
        </thead>
        <tbody>
            @foreach ($tasks as $task)
            <tr>
                <td>{{ $task->subject }}</td>
                <th><a href="{{ route('task.show',$task->id)}}">詳細</a></th>
                <th><a href="{{ route('task.edit',$task->id)}}">編集</a></th>
                <th>
                    @if ($task->completed == 0)
                    完了日時 : {{ $task->complete_date }}
                    @else
                    <form action="{{ route('task.update', $task->id)}}" method="POST">
                        @csrf
                        @method('PUT')
                        <input type="hidden" name="subject" value="{{ $task->subject }}" class="form-control">
                        <input type="hidden" name="description" value="{{ $task->description }}" class="form-control">
                        <input type="hidden" name="completed" value="0">
                        <input type="hidden" name="complete_date" value="{{ \Carbon\Carbon::now()->format("Ymd") }}">
                        <input type="submit" value="完了" class="btn btn-primary">
                    </form>
                    @endif
                </th>
                <th>
                    <form action="{{ route('task.destroy', $task->id)}}" method="POST">
                        @csrf
                        @method('DELETE')
                        <input type="submit" value="削除" class="btn btn-danger">
                    </form>
                </th>
            </tr>
            @endforeach
        </tbody>
    </table>
@endsection
タスクを追加すると、一覧画面に表示されます。

タスク新規作成画面
タスク一覧画面となる「create.blade.php」を下記の内容で、作成します。
@extends('layout')

@section('content')
    <h2>新規作成画面</h2>
    <p><a href="{{ route('task.index')}}" class="btn btn-outline-success">一覧画面</a></p>
    @if ($errors->any())
    <ul>
        @foreach ($errors->all() as $error)
        <li>{{ $error }}</li>
        @endforeach
    </ul>
    @endif
    <form action="{{ route('task.store')}}" method="POST">
        @csrf
        <input type="hidden" name="completed" value="1">
        <div class="form-group">
            <label>案件名</label>
            <input type="text" name="subject" value="{{old('subject')}}" class="form-control">
        </div>
        <div class="form-group">
            <label>内容</label>
            <textarea name="description" rows="3" class="form-control">{{old('description')}}</textarea>
        </div>
        <input type="submit" value="登録" class="btn btn-primary">
    </form>
@endsection
下記の画面でタスクを追加することが可能です。

追加したタスクは一覧画面に表示されます。
完了ボタンをクリックすると完了となり、削除ボタンをクリックすると、案件が削除されます。

タスク詳細画面
タスクの詳細が確認できる画面となる「show.blade.php」を下記の内容で、作成します。
@extends('layout')

@section('content')
    <h2>詳細画面</h2>
    <p><a href="{{ route('task.index')}}" class="btn btn-outline-success">一覧画面</a></p>

    <table class="table">
        <thead>
            <tr>
                <th>id</th>
                <th>案件名</th>
                <th>内容</th>
                <th>作成日時</th>
                <th>更新日時</th>
            </tr>
        </thead>
        <tbody>
            <tr>
                <td>{{ $task->id }}</td>
                <td>{{ $task->subject }}</td>
                <td>{{ $task->description }}</td>
                <td>{{ $task->created_at }}</td>
                <td>{{ $task->updated_at }}</td>
            </tr>
        </tbody>
    </table>
@endsection
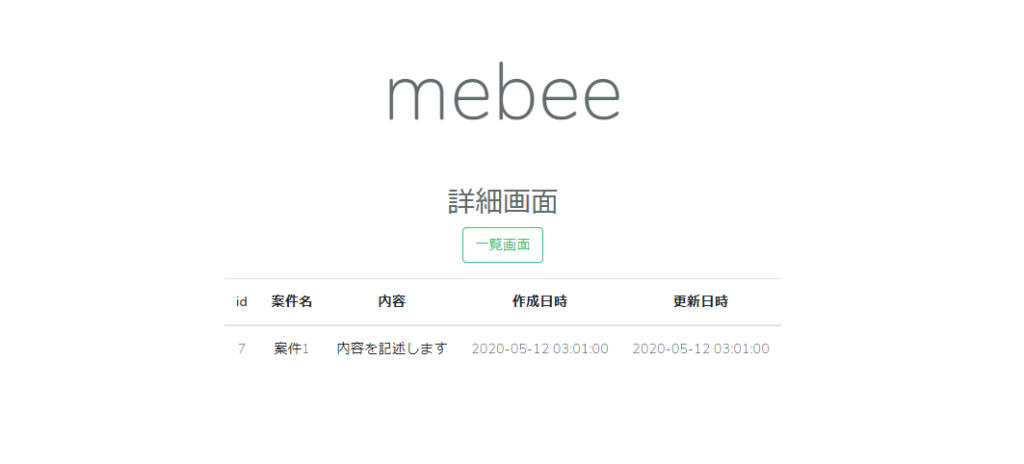
この画面でタスクの詳細が確認できます。

タスク編集画面
タスク編集画面となる「edit.blade.php」を下記の内容で、作成します。
@extends('layout')

@section('content')
    <h2>編集画面</h2>
    <p><a href="{{ route('task.index')}}" class="btn btn-outline-success">一覧画面</a></p>

    @if ($message = Session::get('success'))
        <p>{{ $message }}</p>
    @endif

    @if ($errors->any())
    <ul>
        @foreach ($errors->all() as $error)
        <li>{{ $error }}</li>
        @endforeach
    </ul>
    @endif

    <form action="{{ route('task.update',$task->id)}}" method="POST">
        @csrf
        @method('PUT')
        <div class="form-group">
            <label>案件名</label>
            <input type="text" name="subject" value="{{ $task->subject }}" class="form-control">
        </div>
        <div class="form-group">
            <label>内容</label>
            <textarea name="description" rows="3" class="form-control">{{ $task->description }}</textarea>
        </div>
        <input type="hidden" name="completed" value="{{ $task->completed }}">
        <input type="hidden" name="complete_date" value="{{ $task->complete_date }}">
        <input type="submit" value="編集する" class="btn btn-primary">
    </form>
@endsection
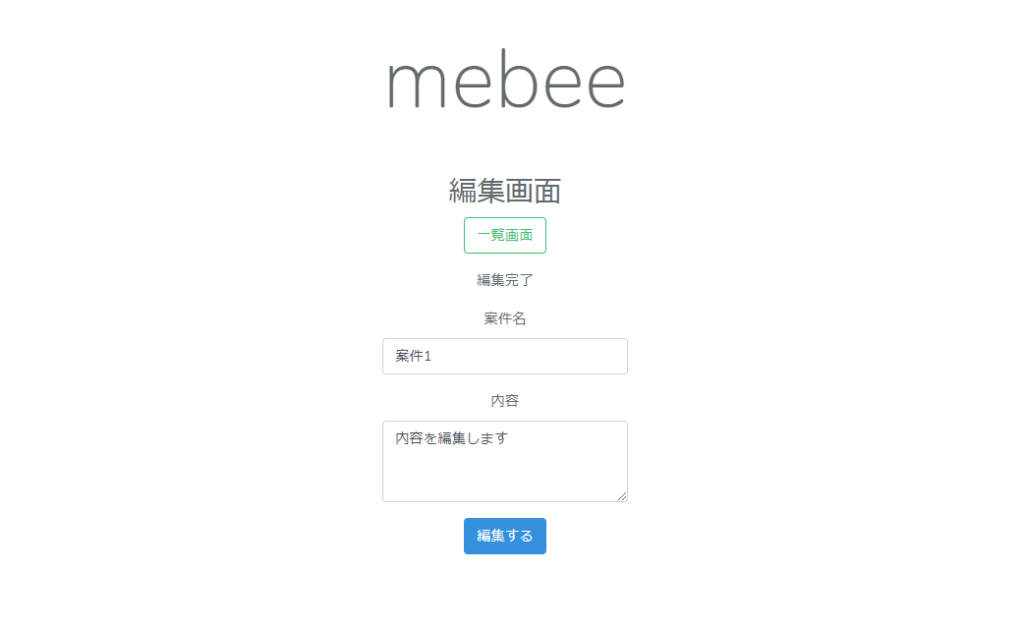
こちらの画面でタスクの編集が可能となります。

実行
必要なソースコードは全て記述されたので、実行してみます。
ここではプライベートIPでもアクセスできるように「–host」を指定してます。
php artisan serve --host 0.0.0.0ブラウザから http://プライベートIP:8000/task にアクセスにして動作を確認します。

-
前の記事

CentOs8 最新版のChef Workstationをインストールする手順 2020.06.24
-
次の記事

Laravel7 DBからデータを取得操作の一覧 2020.06.24


コメントを書く