Laravel7 ファイルをアップロードする手順
Laravel7で指定したファイルをアップロードできるようになるまでの手順を記述してます。
環境
- OS windows10 pro 64bit
- Composer 1.10.5
- PHP 7.4.5
- Laravel Framework 7.6.2
※windows10に Laravel のインストールはこちら
※windows10に Composer のインストールはこちら
※windows10に PHP のインストールはこちら
bootstrap導入
UIに利用しているだけです。
詳しい手順はこちらに記述してますが、下記のコマンドで利用可能になります。
composer require laravel/ui
php artisan ui bootstrap
npm install && npm run dev
コントローラー作成
ファイルをアップロードするためのコントローラーを作成します。
php artisan make:controller UploadControllerapp\Http\Controllers\ UploadController.phpが作成されるので、下記の通りに編集しておきます
<?php

namespace App\Http\Controllers;

use Illuminate\Http\Request;

class UploadController extends Controller
{
    public function index()
    {
        return view('upload');
    }

    public function store(Request $request)
    {
        $file_name = time() . '_' . $request->file->getClientOriginalName();
        $request->file('file')->storeAs('', $file_name);
        $msg = $file_name . "をアップ完了しました";
        return back()->with('success', $msg);
    }
}
ルーティング追加
アクセスするURLを設定するため、ルーティングを記述します。
routes\web.phpに下記を追加します。
Route::resource('/upload', 'UploadController');ビュー作成
次にレイアウト部であるviewを作成します。
resources\views内で「upload.blade.php」を下記の内容で、新たに作成します。
<html lang="{{ str_replace('_', '-', app()->getLocale()) }}">
    <head>
        <meta charset="utf-8">
        <meta name="viewport" content="width=device-width, initial-scale=1">

        <title>Laravel</title>

        <!-- Fonts -->
        <link href="https://fonts.googleapis.com/css?family=Nunito:200,600" rel="stylesheet">
        <!-- bootstrap -->
        <link href="{{ asset('css/app.css') }}" rel="stylesheet">

        <!-- Styles -->
        <style>
            html, body {
                background-color: #fff;
                color: #636b6f;
                font-family: 'Nunito', sans-serif;
                font-weight: 200;
                height: 100vh;
                margin: 0;
            }

            .full-height {
                height: 100vh;
            }

            .flex-center {
                align-items: center;
                display: flex;
                justify-content: center;
            }

            .content {
                text-align: center;
            }

            .title {
                font-size: 84px;
            }

            .m-b-md {
                margin-bottom: 30px;
            }
        </style>
    </head>
    <body>
        <div class="flex-center full-height">
            <div class="content">
                @if ($msg = Session::get('success'))
                <div class="alert alert-primary" role="alert">{{ $msg }}</div>
                @endif
                <div>
                    <form method="POST" action="/upload/" enctype="multipart/form-data">
                        @csrf
                        <div class="form-group">
                          <div class="custom-file">
                            <input type="file" id="file" name="file" class="custom-file-input" id="inputFile">
                            <label class="custom-file-label" for="inputFile" data-browse="参照">ファイルを選択</label>
                          </div>
                        </div>
                        <div class="form-group">
                            <button type="submit" class="btn btn-primary">アップロード</button>
                        </div>
                    </form>
                </div>
            </div>
        </div>
    <script src="https://cdn.jsdelivr.net/npm/bs-custom-file-input/dist/bs-custom-file-input.js"></script>
    <script>
    bsCustomFileInput.init();
    </script>
    </body>
</html>
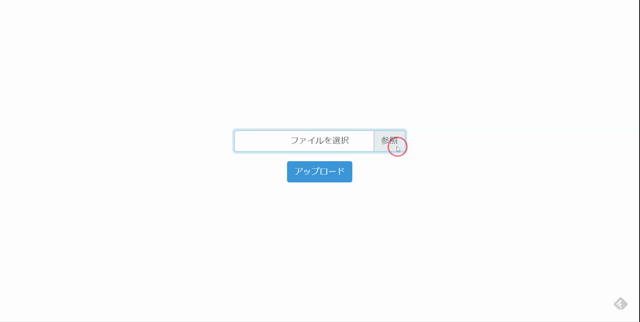
実行
実行します。
php artisan serve --host 0.0.0.0ブラウザから http://プライベートIP:8000/upload にアクセスにアクセスします。
ファイルはstorage\app内にアップされます。
-
前の記事

javascript 別のボタンからボタンをクリックする 2020.09.22
-
次の記事

javascript htmlタグにクラスを追加する 2020.09.22