windows10 Electron-Nuxt.jsでjsonファイルを利用して、通知を行う
Electron-Nuxt.jsでaxiosを利用して、jsonファイルを読み込み、通知などを行うサンプルコード
環境
- OS windows10 pro
- node V10.16.3
- npm 6.9.0
- Electron 6.0.12
- nuxt-buefy 0.3.19
- @nuxtjs/axios 5.9.0
※Electron-Nuxt.jsの環境構築手順はこちら
axiosとbuefyインストール
axiosとbuefyを利用するのでインストールしておく
npm i -D nuxt-buefy
npm i -D @nuxtjs/axios
プロジェクト配下のnuxt.config.jsにmodulesにaxiosとnuxt-buefyを追加しておきます。
 dev: process.env.NODE_ENV === 'DEV',
	modules: [
  '@nuxtjs/axios',
		'nuxt-buefy',
	],
	css: [
		'@/assets/css/global.css'
	]
jsonファイルを読み込むサンプルコード
セキュリティ上よろしくないですが、とりあえず プロジェクト配下のmain.jsの electron.BrowserWindowを下記のように編集します。
win.maximize()もサイズを指定しているのでコメントアウトしておく
win = new electron.BrowserWindow({
		width: 980,
  		height: 600,
		autoHideMenuBar: true,
		icon: path.join(__dirname, 'static/icon.png'),
		webPreferences: {
			nodeIntegration: true
		}
	})
	//win.maximize()
次にlayoutsフォルダ配下のdefult.vueを下記のように編集
※src=””の画像は好きなものを設定して下さい
<template>
  <div>
    <nav
      class="navbar header has-shadow is-primary"
      role="navigation"
      aria-label="main navigation"
    >
      <div class="navbar-brand">
        <a
          class="navbar-item"
          href="/"
        >
          <img
            src=""
            alt="test project"
            height="28"
          >
        </a>

        <div class="navbar-burger">
          <span />
          <span />
          <span />
        </div>
      </div>
    </nav>

    <section class="main-content columns">
      <aside class="column is-2 section">
        <p class="menu-label is-hidden-touch">
          General
        </p>
        <ul class="menu-list">
          <li
            v-for="(item, key) of items"
            :key="key"
          >
            <nuxt-link
              :to="item.to"
              exact-active-class="is-active"
            >
              <b-icon :icon="item.icon" /> {{ item.title }}
            </nuxt-link>
          </li>
        </ul>
      </aside>

      <div class="container column is-10">
        <nuxt />
      </div>
    </section>
  </div>
</template>

<script>
export default {
  data () {
    return {
      items: [
        {
          title: 'Home',
          icon: 'home',
          to: { name: 'index' }
        },
        {
          title: '通知',
          icon: 'lightbulb',
          to: { name: 'news' }
        }
      ]
    }
  }
}
</script>
pagesフォルダ配下にnews.vueを下記の内容で作成します。
<template>
<section class="section">
<h1 class="title">
お知らせ
</h1>
<b-table
:data="lists"
:bordered="isBordered"
:striped="isStriped"
:narrowed="isNarrowed"
:hoverable="isHoverable"
:loading="isLoading"
:focusable="isFocusable"
:mobile-cards="hasMobileCards">
<template slot-scope="props">
<b-table-column field="kubun" label="区分" width="80">
{{ props.row.kubun }}
</b-table-column>
<b-table-column field="title" label="内容" width="200" >
{{ props.row.title }}
</b-table-column>
<b-table-column field="status" label="ステータス" width="80">
<span :class="getColor(props.row.status)">
{{ props.row.status }}
</span>
</b-table-column>
<b-table-column field="date" label="日付" width="50" centered>
{{ new Date(props.row.date).toLocaleDateString() }}
</b-table-column>
</template>
</b-table>
</section>
</template>
<script>
export default {
data () {
return {
columns: [
{
field: 'kubun',
label: '区分',
width: '50',
},
{
field: 'title',
label: 'タイトル',
width: '220',
},
{
field: 'status',
label: 'ステータス',
width: '80',
},
{
field: 'date',
label: '日時',
width: '50',
}
],
lists: [],
isEmpty: false,
isBordered: false,
isStriped: false,
isNarrowed: false,
isHoverable: false,
isFocusable: false,
isLoading: false,
hasMobileCards: true
}
},
methods: {
getColor (calories) {
if (calories == "完了") {
return 'tag is-success'
}
else if(calories == "準備中"){
return 'tag is-info'
}
else if(calories == "対応中"){
return 'tag is-danger'
}else{
return 'tag is-primary'
}
}
},
async asyncData({ app }) {
const baseUrl = 'http://hostname/system.json';
const response = await app.$axios.$get(baseUrl)
.catch(err => {
return err.response
});
if (response.status != 200) {
console.log("例外発生")
}
return { lists: response };
}
}
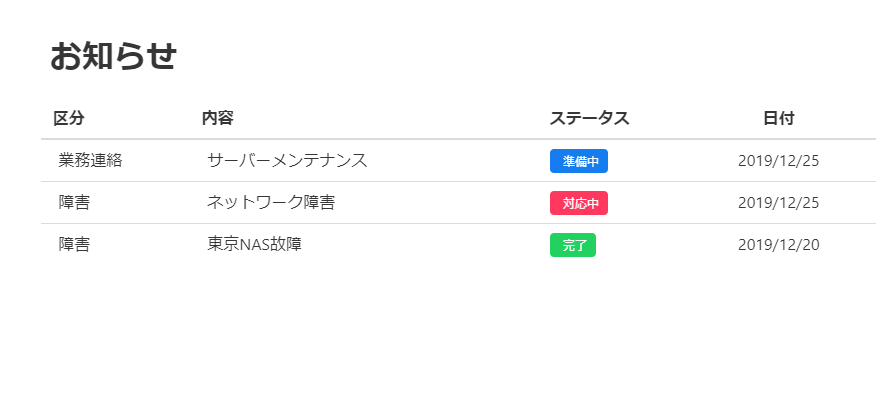
</script>system.jsonというファイルを作成し、接続するサーバーにアップしておきます。
[
    {
        "kubun": "業務連絡",
        "title": "サーバーメンテナンス",
        "status": "準備中",
        "date": "2019/12/25 9:00"
    },
    {
        "kubun": "障害",
        "title": "ネットワーク障害",
        "status": "対応中",
        "date": "2019/12/25 9:00"
    },
    {
        "kubun": "障害",
        "title": "東京NAS故障",
        "status": "完了",
        "date": "2019/12/20 9:00"
    }
]
作成できれば起動してみます。
npm run dev通知をクリックするとクライアントマシンを取得できていることが確認できます。
buildしてみる
最後にビルドしてexeファイルを作成してみます
npm run buildbuildするとdistフォルダが作成されて、配下にexeファイルが作成されます。
追記
起動すると下記のエラー(Cannot GET)が発生しました。
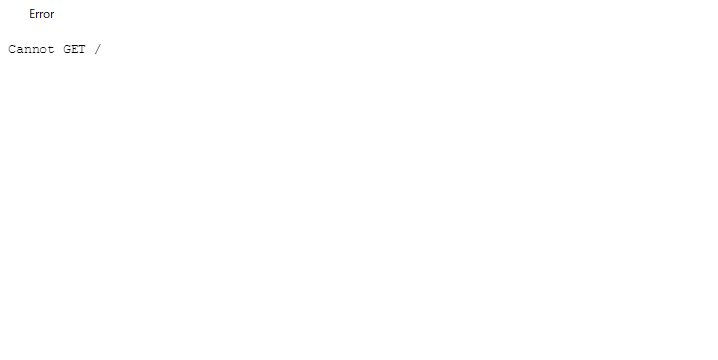
原因は、 nuxt.config.jsで@nuxtjs/axiosを利用していたためで、
	modules: [
		'nuxt-buefy',
    '@nuxtjs/axios',
	],
なのでaxiosを利用します。まずはインストールを行います。
npm install -s axios次に nuxt.config.jsの@nuxtjs/axios をコメントアウトか削除し、pages配下のnews.vueのscript部を下記のように編集します。
<script>
import axios from 'axios';

export default {
  data () {
    return {
        columns: [
            {
                field: 'kubun',
                label: '区分',
                width: '50',
            },
            {
                field: 'title',
                label: 'タイトル',
                width: '220',
            },
            {
                field: 'status',
                label: 'ステータス',
                width: '80',
            },
            {
                field: 'date',
                label: '日時',
                width: '50',
            }
        ],
        isEmpty: false,
        isBordered: false,
        isStriped: false,
        isNarrowed: false,
        isHoverable: false,
        isFocusable: false,
        isLoading: false,
        hasMobileCards: true
    }
  },
  methods: {
    getColor (calories) {
        if (calories == "完了") {
            return 'tag is-success'
        }
        else if(calories == "準備中"){
            return 'tag is-info'
        }
        else if(calories == "対応中"){
            return 'tag is-danger'
        }else{
            return 'tag is-primary'
        }
    }
  },
  async asyncData({ app }) {
    const baseUrl = 'http://hostname/system.json';
    const response = await axios.get(baseUrl)
    .catch(err => {
        return err.response
    });
    if (response.status != 200) {
        console.log("例外発生")
    }

    console.log(response)
    return { lists: response.data };
  }
}
</script>
再度ビルドすると正常に起動します。
-
前の記事

Manjaro19.0 Skypeをインストールする 2020.02.28
-
次の記事

Firebase Databaseの簡単な使い方 2020.02.28