Postfix+Dovecot 無料の「Let’s Encrypt」を使ってSSLを適応する手順
- 作成日 2020.07.17
- 更新日 2022.08.03
- Dovecot Let's Encrypt Postfix SSL
- Dovecot, Let's Encrypt, Postfix, ssl
CentOS7でPostfixとDovecotを使ってメールサーバに無料の SSL 「Let’s Encrypt」を使用してSSLを適応するまでの手順を記述してます。
環境
- OS CentOS Linux release 7.7.1908 (Core)
- Postfix 2.10.1
- dovecot 2.2.36
- サーバー さくらのクラウド
- ドメイン お名前.com
インストール
必要なものを、先に全てインストールしておきます。
※ここでは全てrootで作業してます。
# yum install -y postfix dovecot cyrus-sasl cyrus-sasl-*DNS設定
MXレコードを設定しておきます。
※自分の場合はお名前.comで設定してます。
構成は下記の通りとなります
| ホスト名 | レコード | 値 |
| example.com | A | 111.222.333.444 |
| mail.example.com | A | 111.222.333.444 |
| example.com | MX | mail.example.com |

SSL証明書取得
Let’s Encryptのスクリプトをgitからcloneして入手します。
# git clone https://github.com/certbot/certbot.git移動します。
# cd certbot証明書を取得時に80番ポートを利用するので許可しておきます。
また、 80番ポートがすでに利用されているとエラーになるため、80番ポートを使用しているapache等のアプリがあれば停止しておきます。
# firewall-cmd --add-service={http,https} --permanent
# firewall-cmd --reload
今回はメールサーバーのみなため 「standaloneモード」で証明書を取得します。
# certbot certonly –standalone -d <コモンネーム> -m <任意のメールアドレス> –agree-tos

<例>
certbot certonly –standalone -d example.com -m info@example.com –agree-tos
「 /etc/letsencrypt/live/mail.example.com/ 」が作成されます。
# ls /etc/letsencrypt/live/mail.example.com

<出力結果>
README  cert.pem  chain.pem  fullchain.pem  privkey.pem
Postfix設定
postfixを設定を行います。
先にバックアップしておきます。
# cp /etc/postfix/main.cf /etc/postfix/main.cf.`date +%y%m%d_%H%M%S`
# cp /etc/postfix/master.cf /etc/postfix/master.cf.`date +%y%m%d_%H%M%S`
main.cfを編集します。
# vim /etc/postfix/main.cf編集内容は下記となります。
# ホスト名(fqdn)を指定 mxレコードに設定したvalue
myhostname = mail.example.com

# メールで使用するドメイン名
mydomain = example.com

myorigin = $mydomain
inet_interfaces = all
mydestination = $myhostname, localhost.$mydomain, localhost, $mydomain

# ローカルネットワークを設定
mynetworks_style = host

# Maildir形式を指定
home_mailbox = Maildir/

# メールサーバのソフト名・バージョンを隠蔽化
smtpd_banner = $myhostname ESMTP unknown

# SMTP-Authの設定を下部に追加しておきます
smtpd_sasl_type = dovecot
smtpd_sasl_path = private/auth
smtpd_sasl_auth_enable = yes
smtpd_tls_cert_file = /etc/letsencrypt/live/mail.example.com/fullchain.pem
smtpd_tls_key_file = /etc/letsencrypt/live/mail.example.com/privkey.pem
smtpd_tls_session_cache_database = btree:/var/lib/postfix/smtpd_scache
smtpd_tls_session_cache_timeout = 3600s
smtpd_tls_received_header = yes
smtpd_tls_loglevel = 1
smtpd_sasl_security_options = noanonymous
smtpd_sasl_local_domain = $myhostname
smtpd_recipient_restrictions = permit_mynetworks,permit_auth_destination,permit_sasl_authenticated,reject
master.cfを編集します。
# vim /etc/postfix/master.cf編集内容は下記となります。
smtps     inet  n       -       n       -       -       smtpd
#  -o syslog_name=postfix/smtps
  -o smtpd_tls_wrappermode=yes
  -o smtpd_sasl_auth_enable=yes
#  -o smtpd_reject_unlisted_recipient=no
#  -o smtpd_client_restrictions=$mua_client_restrictions
#  -o smtpd_helo_restrictions=$mua_helo_restrictions
#  -o smtpd_sender_restrictions=$mua_sender_restrictions
  -o smtpd_recipient_restrictions=permit_sasl_authenticated,reject
#  -o milter_macro_daemon_name=ORIGINATING
postfixの自動起動と起動を設定しておきます。
# systemctl start postfix
# systemctl enable postfix
saslauthd起動
SMTP認証設定用に自動起動 と起動を行います。
# systemctl start saslauthd
# systemctl enable saslauthd
事前に設定予定のファイルをバックアップしておきます。
# cp /etc/sasl2/smtpd.conf /etc/sasl2/smtpd.conf.`date +%y%m%d_%H%M%S`SMTP認証に個別のユーザー名、パスワードを使用します。
# vim /etc/sasl2/smtpd.conf

<編集>
pwcheck_method: auxprop
mech_list: plain login
Dovecot設定
次にDovecotの設定を行います。
事前に編集予定のファイルをバックアップしておきます。
# cp /etc/dovecot/conf.d/10-mail.conf /etc/dovecot/conf.d/10-mail.conf.`date +%y%m%d_%H%M%S`
# cp /etc/dovecot/conf.d/10-auth.conf /etc/dovecot/conf.d/10-auth.conf.`date +%y%m%d_%H%M%S`
# cp /etc/dovecot/dovecot.conf /etc/dovecot/dovecot.conf.`date +%y%m%d_%H%M%S`
# cp /etc/dovecot/conf.d/10-master.conf /etc/dovecot/conf.d/10-master.conf.`date +%y%m%d_%H%M%S`
# cp /etc/dovecot/conf.d/10-ssl.conf /etc/dovecot/conf.d/10-ssl.conf.`date +%y%m%d_%H%M%S`
各ファイルを編集します。
vim /etc/dovecot/conf.d/10-mail.conf
## メールの保存場所をホームディレクトリのMaildirに設定
mail_location = maildir:~/Maildir
vim /etc/dovecot/conf.d/10-auth.conf
## プレーンテキスト認証を許可
disable_plaintext_auth = no

## 認証方法にloginを追加
auth_mechanisms = plain login
vim /etc/dovecot/dovecot.conf
## コメントアウトを解除して、ipv6は利用しない
protocols = imaps pop3s lmtp
listen = *
vim /etc/dovecot/conf.d/10-master.conf
service imap-login {
  inet_listener imap {
    port = 0
  }
  inet_listener imaps {
    port = 993
    ssl = yes
  }
}

service pop3-login {
  inet_listener pop3 {
    port = 0
  }
  inet_listener pop3s {
    port = 995
    ssl = yes
  }
}

service auth {
  unix_listener auth-userdb {
    mode = 0666
    user = postfix
    group = postfix
  }

  unix_listener /var/spool/postfix/private/auth {
    mode = 0666
    user = postfix
    group = postfix
  }
}
vim /etc/dovecot/conf.d/10-ssl.conf
#ssl = no
ssl = required

# PEM encoded X.509 SSL/TLS certificate and private key. They're opened before
# dropping root privileges, so keep the key file unreadable by anyone but
# root. Included doc/mkcert.sh can be used to easily generate self-signed
# certificate, just make sure to update the domains in dovecot-openssl.cnf
#ssl_cert = </etc/pki/dovecot/certs/dovecot.pem
#ssl_key = </etc/pki/dovecot/private/dovecot.pem
ssl_cert = </etc/letsencrypt/live/mail.example.com/fullchain.pem
ssl_key = </etc/letsencrypt/live/mail.example.com/privkey.pem
Dovecotの自動起動と起動をします。
# systemctl start dovecot
# systemctl enable dovecot
Cron設定
Let’s Encrypt の有効期限は3ヶ月なため、証明書を自動更新できるようにcronに設定しておきます。
## インストール

# yum -y install cronie-noanacron

## 起動と自動起動設定

# systemctl enable --now crond
2ヶ月に1回くらいの更新にしておきます。
「/etc/cron.d/」 に適当なファイルを作成し、そこに記述します。
※ここでは「letsencrypt」というファイルを作成してます。
# vim /etc/cron.d/letsencrypt

<編集>
0 0 */2 * * /root/certbot/certbot-auto renew -q --deploy-hook "systemctl restart postfix dovecot"
Firewall設定
firewallが設定してある場合は、許可設定を行います。
# firewall-cmd --add-service={smtp,smtps,imaps,pop3s} --permanent
# firewall-cmd --reload
メールアカウント作成
メールアカウントを作成してみます。
ここではmailtestというアカウントを作成します。
## 新規ユーザー追加時に自動的にメールボックスを作成

# mkdir -p /etc/skel/Maildir/{new,cur,tmp}
# chmod -R 700 /etc/skel/Maildir/

## ユーザー作成

# useradd mailtest -s /sbin/nologin

## パスワード設定 ここで設定したパスワードで認証します

# passwd mailtest
メーラー設定
outlookの設定例を表示しておきます。
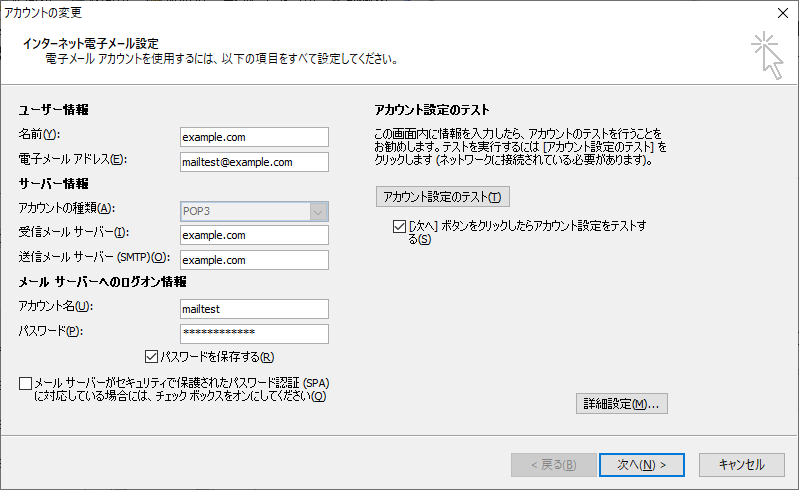
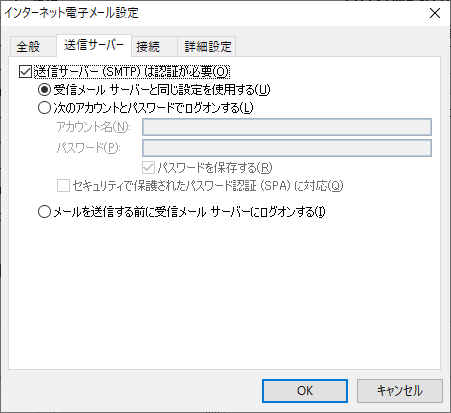
SSLを設定します。

認証が必要にチェックしておきます。
ログ確認
うまく受信できない場合は、ログを確認してみて下さい。
# systemctl status postfix -l
# systemctl status dovecot -l-
前の記事

Centos8 php8.0をインストールする方法 2020.07.17
-
次の記事

Nuxt.js ライブラリ「vue-audio-visual」を使用してオーディオを視覚化する 2020.07.17