Nuxt.js ライブラリ「vuesence-sliding-header」をインストールしてスティッキーヘッダーを実装する
- 作成日 2020.09.14
- nuxt.js
- nuxt.js, vuesence-sliding-header, インストール, ライブラリ

ライブラリ「vuesence-sliding-header」をインストールすると、スティッキーヘッダーの実装が簡単に可能です。ここでは、nuxt.jsでvuesence-sliding-headerを利用するための手順と簡単な使い方を記述してます。
環境
- OS CentOS Linux release 8.0.1905 (Core)
- node V12.16.3
- npm 6.14.4
- nuxt 2.12.2
Nuxt.js環境構築
下記のコマンドで構築。ここでは、nuxtappという名前でプロジェクトを作成してます。
npx create-nuxt-app nuxtappここでは、下記の設定で構築してます。
create-nuxt-app v2.15.0
✨  Generating Nuxt.js project in testnuxt
? Project name nuxtapp
? Project description My doozie Nuxt.js project
? Author name
? Choose programming language JavaScript
? Choose the package manager Yarn
? Choose UI framework None
? Choose custom server framework None (Recommended)
? Choose Nuxt.js modules (Press <space> to select, <a> to toggle all, <i> to invert selection)
? Choose linting tools ESLint
? Choose test framework None
? Choose rendering mode Universal (SSR)
? Choose development tools (Press <space> to select, <a> to toggle all, <i> to invert selection)
yarn run v1.22.4※yarnをインスールしているので、ここではnpmではなくyarnを選択してます。
## yarnのインスールは下記コマンド
npm install -g yarn
外部IP許可
localhostではなくプライベートIPを利用して接続して確認したいので、作成したプロジェクトnuxtappの配下にあるpackage.jsonに下記を追加します。
"config": {
  "nuxt": {
    "host": "0.0.0.0",
    "port": "3000"
  }
},
vuesence-sliding-headerインストール
下記のコマンドでインストールします。
## 作成したプロジェクトに移動
cd nuxtapp

## インストール
yarn add @vuesence/sliding-header
vuesence-sliding-header使い方
plugins配下にplugin.jsを作成し、下記の通りに編集します。
import Vue from 'vue'
import SlidingHeader from '@vuesence/sliding-header'
Vue.component('sliding-header', SlidingHeader)
プロジェクト配下にあるnuxt.config.jsに下記のコードを追加します。
plugins: [
    {
      src: '@/plugins/plugin',
      mode: 'client'
    }
  ],
pages配下にあるindex.vueを下記の通りに編集します。
<template>
  <div id="app">
    <sliding-header :threshold-hide="200" :threshold-open="400">
      <template v-slot:first-header>
        <p>The First Header</p>
      </template>
      <template v-slot:second-header>
        <p>The Second Header</p>
      </template>
    </sliding-header>
    <p v-for="n in 50" v-bind:key="n">
      {{ n }}. Lorem ipsum dolor sit amet, consectetur adipiscing elit,
      sed do eiusmod tempor incididunt ut labore et dolore magna aliqua.
      Ut enim ad minim veniam, quis nostrud exercitation ullamco laboris
      nisi ut aliquip ex ea commodo consequat. Duis aute irure dolor in
      reprehenderit in voluptate velit esse cillum dolore eu fugiat nulla
      pariatur. Excepteur sint occaecat cupidatat non proident, sunt in
      culpa qui officia deserunt mollit anim id est laborum.
    </p>
  </div>
</template>

<script>
export default {
  components: {
  },
  data() {
    return {
    }
  }
}
</script>

<style>
.sliding-header {
	display: flex;
	justify-content: center;
	align-items: center;
	transition: 0.3s;
}
.sliding-header.first-header {
	background-color: lightgreen;
	height: 60px;
}
.sliding-header.second-header {
	background-color: lightblue;
	height: 100px;
}
.sliding-header.hidden {
	top: -100px;
}
</style>
起動します
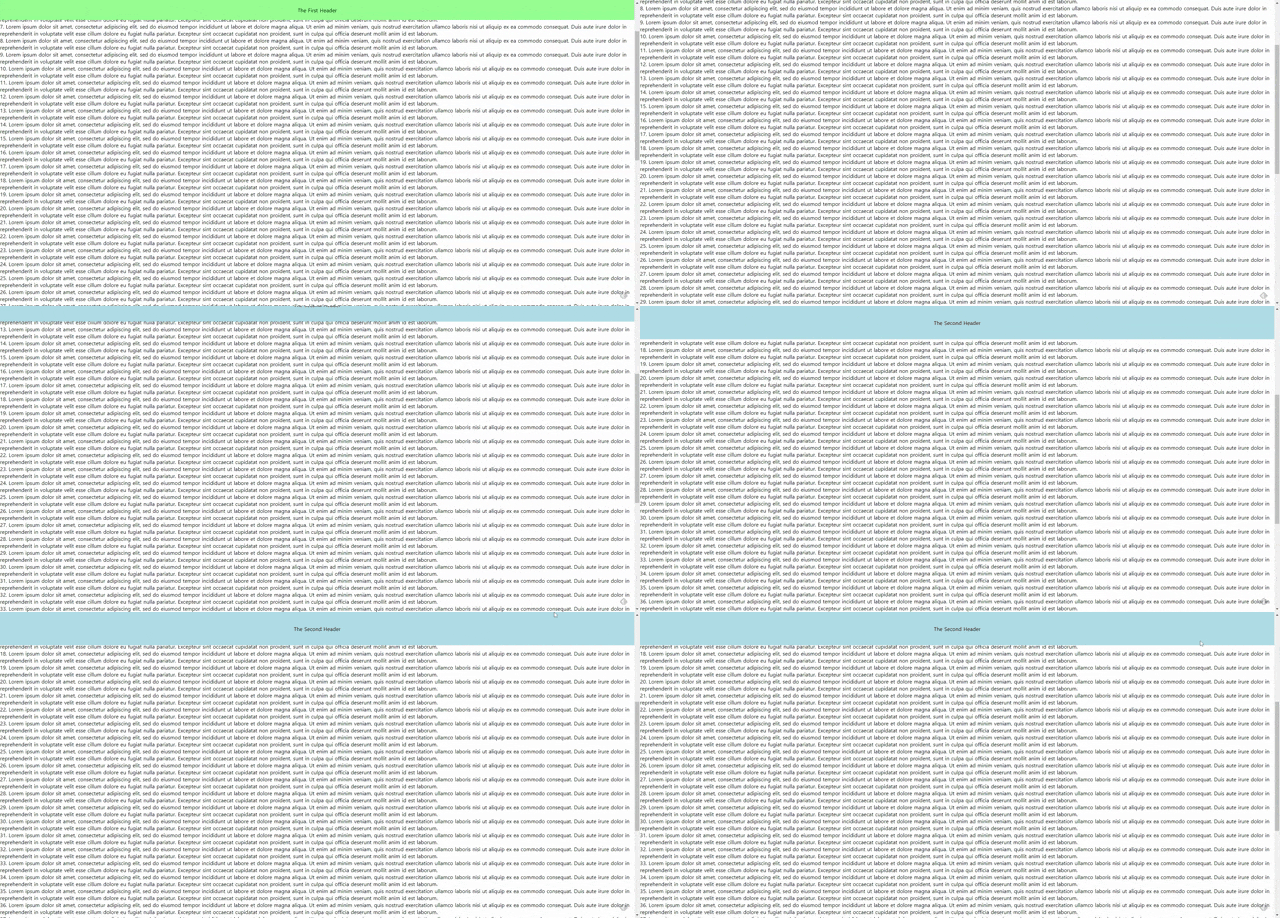
yarn devブラウザから http://プライベートIP:3000にアクセスすると、スティッキーヘッダーが実装されていることが確認できます。

-
前の記事

javascript 1階層下の最初のhtmlタグ(子要素)を取得する 2020.09.14
-
次の記事

javascript IPアドレスであるかの確認を行う 2020.09.14


コメントを書く