javascript 要素を置換する
- 作成日 2021.05.16
- 更新日 2022.04.15
- javascript
- javascript
javascriptで、replaceChildを使用して要素を置換するサンプルコードを記述してます。
環境
- OS windows10 pro 64bit
- Apache 2.4.43
- ブラウザ chrome 100.0.4896.75
replaceChild使い方
「replaceChild」を使用すると、要素を置換することが可能です。
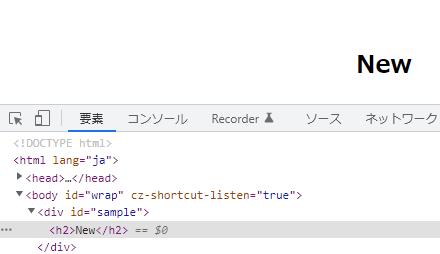
親要素.replaceChild(新しい要素, 古い子要素);実際に使用してみます。
<div id="sample">
  <p id="old">old</p>
</div>

<script>

// 置換する要素
let newOne = document.createElement("h2");

// テキストを追加
newOne.appendChild(document.createTextNode("mew"))

// pタグを生成した要素に置換
document.getElementById('sample').replaceChild(newOne, document.getElementById('old'));

</script>
実行結果をみると、置換されていることが確認できます。
サンプルコード
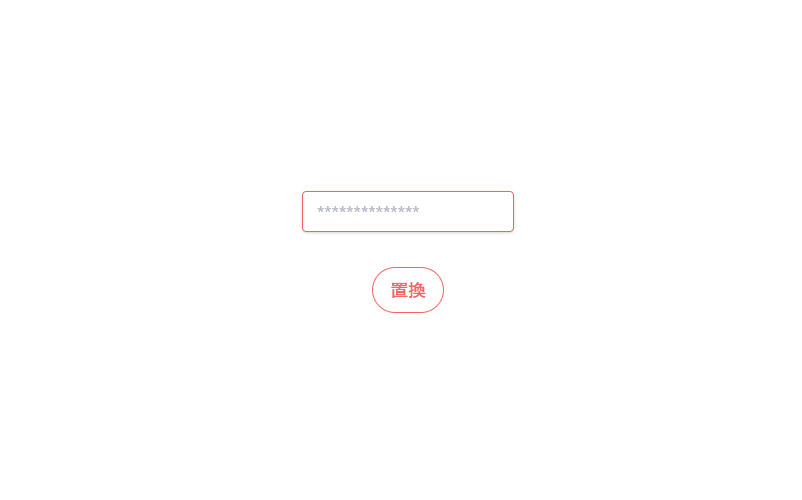
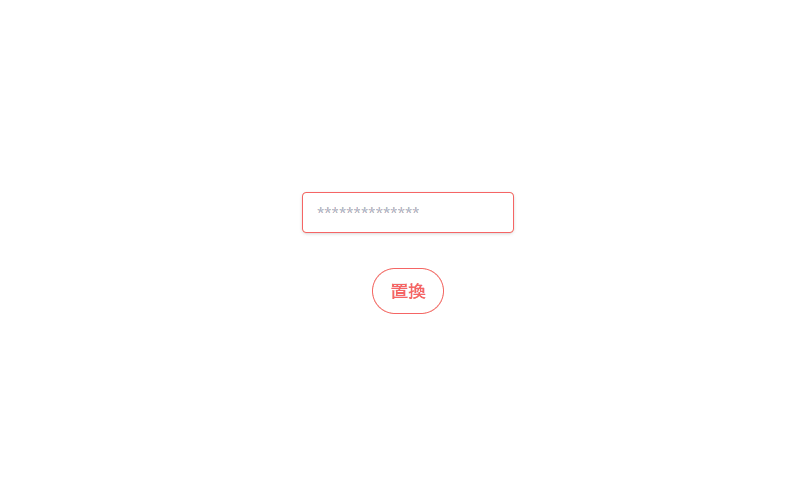
以下は、
「置換」ボタンをクリックすると「type=password」から新しい「type=text」要素に置換する
サンプルコードとなります。
※cssには「tailwind」を使用してます。
<!DOCTYPE html>
<html lang="ja">

<head>
  <meta charset="utf-8">
  <title>mebeeサンプル</title>
  <link href="https://unpkg.com/tailwindcss@^1.0/dist/tailwind.min.css" rel="stylesheet">
</head>

<script>

  function hoge() {

    const elm = document.createElement("input");

    elm.setAttribute("type", "text");
    elm.setAttribute("value", "mebee");
    elm.setAttribute("class", "shadow appearance-none border border-teal-500 rounded w-full py-2 px-3 text-teal-700 mb-3 leading-tight focus:outline-none focus:shadow-outline");

    foo.replaceChild(elm, password);

  }

  window.onload = () => {
    // クリックイベントを登録
    btn.onclick = () => { hoge(); }; // document.getElementById('btn');を省略
  }

</script>

<body>
  <div class="container mx-auto my-56 w-56 px-4">

    <div id="foo">
      <input id="password" type="password"
        class="shadow appearance-none border border-red-500 rounded w-full py-2 px-3 text-gray-700 mb-3 leading-tight focus:outline-none focus:shadow-outline"
        placeholder="**************">
    </div>

    <div class="flex justify-center">

      <button id="btn" type="button"
        class="mt-5 bg-transparent border border-red-500 hover:border-red-300 text-red-500 hover:text-red-300 font-bold py-2 px-4 rounded-full">
        置換
      </button>

    </div>
  </div>

</body>

</html>
置換されていることが確認できます。
-
前の記事

python numpyを使用して配列を作成する 2021.05.15
-
次の記事

AlmaLinux FTPソフト「filezilla」をインストールする 2021.05.17