CentOs7にPostgreSQL11.5をインストールする
- 作成日 2019.10.06
- 更新日 2020.07.20
- centos7 PostgreSQL
- centos7, PostgreSQL11.5

CentOS 7 系の標準リポジトリ はPostgreSQL11ではないので、リポジトリを追加してインストールする
目次
Centos7バージョン
# cat /etc/centos-release
CentOS Linux release 7.7.1908 (Core)
インストール
リポジトリを追加して、インストールを行っていく
## リポジトリ追加
yum install https://download.postgresql.org/pub/repos/yum/11/redhat/rhel-7-x86_64/pgdg-centos11-11-2.noarch.rpm

## バージョン確認
yum info postgresql11-server

<出力結果>
名前                : postgresql11-server
アーキテクチャー    : x86_64
バージョン          : 11.5
リリース            : 1PGDG.rhel7
容量                : 4.7 M
リポジトリー        : pgdg11/7/x86_64
要約                : The programs needed to create and run a PostgreSQL server
URL                 : https://www.postgresql.org/
ライセンス          : PostgreSQL
説明                : PostgreSQL is an advanced Object-Relational database management system (DBMS).
                    : The postgresql11-server package contains the programs needed to create
                    : and run a PostgreSQL server, which will in turn allow you to create
                    : and maintain PostgreSQL databases.

## インストール
yum install postgresql11-server postgresql11

## 有効にする
systemctl enable postgresql-11

## 起動
systemctl start postgresql-11

## ステータス確認
systemctl status postgresql-11

<出力結果>
Active: active (running)

## ログイン
su - postgres
以上で完了
ユーザー作成
ユーザーの作成を行う
## ログイン
su - postgres

-bash-4.2$createuser --pwprompt --interactive pgadmin
新しいロールのためのパスワード:パスワードを設定
もう一度入力してください:再入力
新しいロールをスーパーユーザにしますか? (y/n)y

## ログインテスト
psql -h localhost -U pgadmin -d postgres
psql: FATAL:  ユーザ"pgadmin"のIdent認証に失敗しました
Ident認証に失敗と表示されたので、設定ファイルを変更し、 認証方式 の変更を行う
## postgresql.conf編集
(PostgreSQLはデフォルトではリモート接続できないので、設定を変更)
vim /var/lib/pgsql/11/data/postgresql.conf

<編集箇所>
listen_addresses = '*'
port = 5432

## pg_hba.confファイル変更(md5に変更する)
vim /var/lib/pgsql/11/data/pg_hba.conf

<編集前>
# "local" is for Unix domain socket connections only
local   all             all                                     peer
# IPv4 local connections:
host    all             all             127.0.0.1/32            ident
# IPv6 local connections:
host    all             all             ::1/128                 ident
# Allow replication connections from localhost, by a user with the
# replication privilege.
local   replication     all                                     peer
host    replication     all             127.0.0.1/32            ident
host    replication     all             ::1/128                 ident

<編集後>
# TYPE  DATABASE        USER            ADDRESS                 METHOD

# "local" is for Unix domain socket connections only
local   all             all                                     peer
host    all             all             192.168.0.0/16         md5
# IPv4 local connections:
host    all             all             127.0.0.1/32            md5
# IPv6 local connections:
host    all             all             ::1/128                 md5
# Allow replication connections from localhost, by a user with the
# replication privilege.
local   replication     all                                     peer
host    replication     all             127.0.0.1/32            md5
host    replication     all             ::1/128                 md5

## 変更点
追加 同一ネットワークから接続許可(自分の環境だと下記となる)
host    all             all             192.168.0.0/16         md5

ident( Ident 認証) → md5(パスワード認証方式 MD5-hashed 暗号化)に変更

## 再起動
systemctl restart postgresql-11

## ログインテスト
[root@*****]# psql -h localhost -U pgadmin -d postgres
ユーザ pgadmin のパスワード:
psql (11.5)
"help" でヘルプを表示します。

postgres=#

→ ログイン成功
postgresql.conf編集
PostgreSQLはデフォルトではリモート接続できないので、設定を変更
## postgresql.conf編集
vim /var/lib/pgsql/11/data/postgresql.conf

<編集箇所>
listen_addresses = '*'
port = 5432
PostgreSQL のクライアント認証について
Ident・MD5・password ・ PAM ・ Peer ・ Trust といった認証方式 が存在する
- Ident OSで設定されている現在のユーザー名(identサーバから取得)と、PostgreSQLのユーザー名が一致した場合認証(TCP/IP接続のみ )
- MD5 パスワード認証( 認証時にMD5暗号化パスワード )
- Trust パスワードなしでログインすることが可能
- password パスワード認証( 平文のパスワード )
firewallの設定
外部ネットワークからのアクセスを許可する
## 恒久的に5432許可
firewall-cmd --add-port=5432/tcp --zone=public --permanent

## リロード
firewall-cmd --reload
同一ネットワークから接続確認
DBeverを利用して接続確認を行う
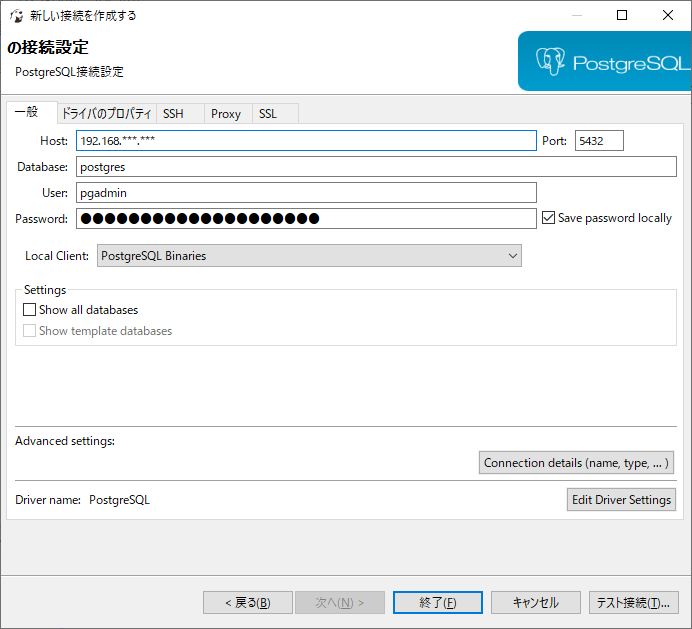
「テスト接続」ボタンをクリック
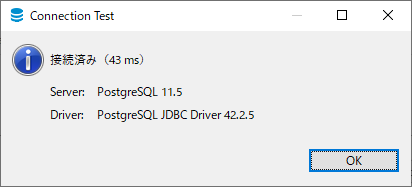
接続できたので完了
-
前の記事

CentOs7 locateコマンドを利用できるようにする 2019.10.06
-
次の記事

Centos7にKongaを構築する 2019.10.07