CentOs7.7 PostgreSQL12をインストールする
- 作成日 2020.03.18
- 更新日 2020.07.22
- centos7 PostgreSQL
- CentOs7.7, PostgreSQL12, インストール

CentOs7.7にpostgreSQL12をインストールする手順となります。けっこうはまりましたが、無事インストールできました。
目次
環境
- CentOS Linux release 7.7.1908 (Core)
- PostgreSQL 12.2
リポジトリの追加
リポジトリを追加します。
## rootで実行
su

## リポジトリ追加
yum -y install https://download.postgresql.org/pub/repos/yum/reporpms/EL-7-x86_64/pgdg-redhat-repo-latest.noarch.rpm

<出力結果>
 準備             :
  インストール中   : pgdg-redhat-repo-42.0-8.noarch
  検証             : pgdg-redhat-repo-42.0-8.noarch

インストール済み:
  pgdg-redhat-repo-42.0-8.noarch
バージョンの確認をしておきます。
yum info  postgresql-12

<出力結果>
インストール済みパッケージ
名前                : postgresql12-server
アーキテクチャー    : x86_64
バージョン          : 12.2
リリース            : 2PGDG.rhel7
容量                : 19 M
リポジトリー        : installed
提供元リポジトリー  : pgdg12
要約                : The programs needed to create and run a PostgreSQL server
URL                 : https://www.postgresql.org/
ライセンス          : PostgreSQL
説明                : PostgreSQL is an advanced Object-Relational database management system (DBMS).
                    : The postgresql12-server package contains the programs needed to create
                    : and run a PostgreSQL server, which will in turn allow you to create
                    : and maintain PostgreSQL databases.
PostgreSQL12インストール
postgresSQLをインストールします。
yum -y install postgresql12-server postgresql12-contrib起動設定を行います。
## 確認
systemctl list-unit-files | grep postgresql

<出力結果>
postgresql-12.service                         disabled
↑
自動起動しないに設定されている

## 自動起動設定
systemctl enable postgresql-12
データベースクラスタ作成
データベースのファイルが作成される場所を指定しておきます。ここではpdataとディレクトリに作成してます。
vi /usr/lib/systemd/system/postgresql-12.service

<編集箇所>
Environment=PGDATA=/var/lib/pgsql/12/data/
↓
Environment=PGDATA=/pdata/
設定ファイルの再読込を行います。
systemctl daemon-reloadinitdbコマンドでデータベースクラスタを作成します。
PGSETUP_INITDB_OPTIONS="-E UTF8 --no-locale" /usr/pgsql-12/bin/postgresql-12-setup initdb

<出力結果>
Initializing database ... OK
postgreSQLのファイルやディレクトリが作成されていることを確認します。
ls /pdata最後にPATHを追加します。
## ログイン
su - postgres

## 編集
-bash-4.2$ vi /var/lib/pgsql/.pgsql_profile

<追加>
PATH=/usr/pgsql-12/bin:$PATH
export PATH

## 編集
-bash-4.2$ vi /var/lib/pgsql/.bash_profile

<編集>
[ -f /etc/profile ] && source /etc/profile
#PGDATA=/var/lib/pgsql/12/data
PGDATA=/pdata
export PGDATA
# If you want to customize your settings,
# Use the file below. This is not overridden
# by the RPMS.
[ -f /var/lib/pgsql/.pgsql_profile ] && source /var/lib/pgsql/.pgsql_profile
反映させます。
-bash-4.2$ source ~/.bash_profile
-bash-4.2$ exit
PostgreSQL起動
postgreSQLを起動します。
systemctl start postgresql-12下記のエラーが発生してしまいました。
systemd[1]: Unit postgresql-12.service entered failed state.
systemd[1]: postgresql-12.service failed.
polkitd[26905]: Unregistered Authentication Agent for unix-process:8391
色々、試行錯誤しましたが結局OS再起動で治りました。
reboot認証方式設定
postgreSQLの認証の設定を行います。
## バックアップ
cp /pdata/pg_hba.conf /pdata/pg_hba.conf.back

## 編集
vi /pdata/pg_hba.conf

<編集前>
# "local" is for Unix domain socket connections only
local   all             all                                     peer
# IPv4 local connections:
host    all             all             127.0.0.1/32            ident
# IPv6 local connections:
host    all             all             ::1/128                 ident
# Allow replication connections from localhost, by a user with the
# replication privilege.
local   replication     all                                     peer
host    replication     all             127.0.0.1/32            ident
host    replication     all             ::1/128                 ident

<編集後>
# TYPE  DATABASE        USER            ADDRESS                 METHOD

# "local" is for Unix domain socket connections only
local   all             all                                     peer
host    all             all             192.168.0.0/16         md5
# IPv4 local connections:
host    all             all             127.0.0.1/32            md5
# IPv6 local connections:
host    all             all             ::1/128                 md5
# Allow replication connections from localhost, by a user with the
# replication privilege.
local   replication     all                                     peer
host    replication     all             127.0.0.1/32            md5
host    replication     all             ::1/128                 md5

## 変更点
追加 同一ネットワークから接続許可(自分の環境だと下記となる)
host    all             all             192.168.0.0/16         md5

ident( Ident 認証) → md5(パスワード認証方式 MD5-hashed 暗号化)に変更
外部接続許可
PostgreSQLはデフォルトではリモート接続できないので、設定を変更
## バックアップ
cp /pdata/postgresql.conf /pdata/postgresql.conf.back

## postgresql.conf編集
vi /pdata/postgresql.conf

<編集箇所>
listen_addresses = '*'
port = 5432
ついでにログの形式とバッファサイズを指定しておきます。
#shared_buffers = 128MB                 # min 128kB
shared_buffers = 256MB

#log_filename = 'postgresql-%a.log'     # log file name pattern,
log_filename = 'postgresql-%Y-%m-%d_%H%M%S.log'
再起動して設定を反映させる
systemctl restart postgresql-12ユーザー作成
ユーザーを作成してみます。
## ログイン
su - postgres

-bash-4.2$ createuser --pwprompt --interactive pgadmin
新しいロールのためのパスワード:
もう一度入力してください:
新しいロールをスーパユーザにしますか? (y/n)y
-bash-4.2$ exit
作成したユーザーでログインしてみます。
psql -h localhost -U pgadmin -d postgres

<出力結果>
postgres=#
成功したので、外部からの接続テストを行います。
firewall設定
firewall-cmd --add-port=5432/tcp --zone=public --permanent
firewall-cmd --reload
外部接続テスト
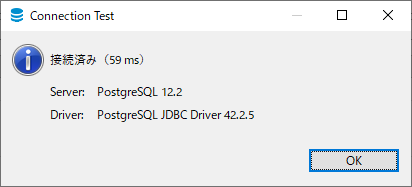
ここでDBeaverを使ってテストしてます。
必要情報を入力します。
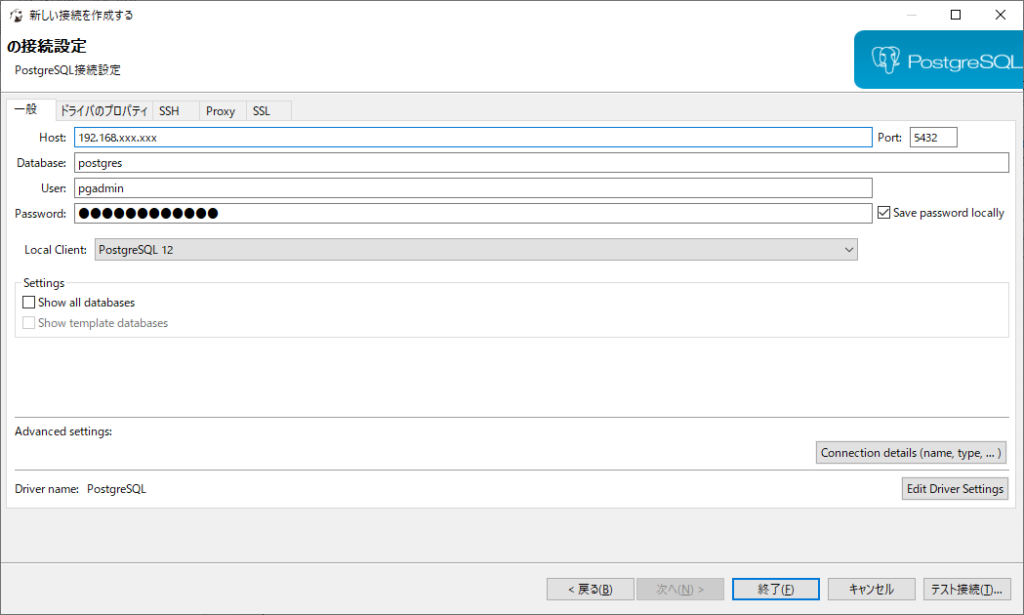
テスト接続をクリックすると接続が成功したことが確認できます。
![Kong kong strat時に「 [warn] ulimit is currently set to “1024”. For better performance set it to at least “4096” using “ulimit -n” Kong started」が発生した場合の対処法](https://mebee.info/wp-content/uploads/2019/09/images-1-150x150.png)