javascript htmlの要素を奇数・偶数ごとに処理を分ける
- 作成日 2022.08.19
- javascript
- javascript

javascriptで、htmlの要素を奇数・偶数ごとに処理を分けるサンプルコードを記述してます。
環境
- OS windows11 pro 64bit
- Apache 2.4.43
- ブラウザ chrome 104.0.5112.81
奇数・偶数ごとに処理を分ける
奇数・偶数ごとに処理を分けるには「forEach」で要素の順番を取得して処理を分けます。
以下のように、liタグを全て取得して、奇数・偶数に分けてクラスを付与してみます。
<ul id="sample">
<li>1</li>
<li>2</li>
<li>3</li>
<li>4</li>
<li>5</li>
</ul>
<script>
// 要素を取得
const elm = document.querySelectorAll('#sample li');
// NodeList(5) [li, li, li, li, li]
console.log(elm);
// NodeListは配列化しなくてもforEachが使用できます
elm.forEach(function(v, i){
// iが0から開始されるので+1しておく
if (((i+1) % 2) === 0) {
v.classList.add('even'); //偶数
} else {
v.classList.add('odd'); //奇数
}
});
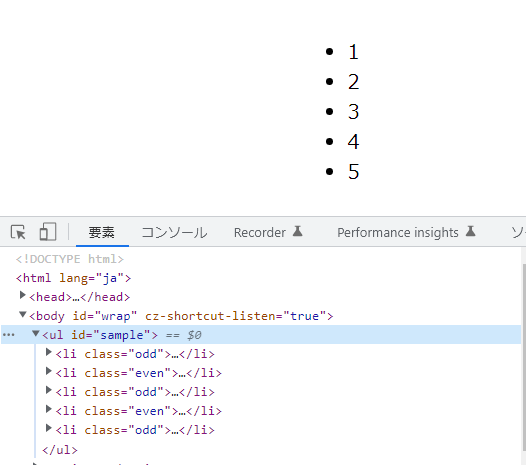
</script>実行結果を見ると、クラスが奇数・偶数に分かれて付与されていることが確認できます。
「getElementsByTagName」などは「HTMLCollection」なので、スプレッド構文などで一度配列化してから使用します。
<ul id="sample">
    <li>1</li>
    <li>2</li>
    <li>3</li>
    <li>4</li>
    <li>5</li>
</ul>

<script>

// 要素を取得
const elm = document.getElementsByTagName('li');

// HTMLCollection(5) [li, li, li, li, li]
console.log(elm);

// 配列化して使用
[...elm].forEach(function(v, i){

    // iが0から開始されるので+1しておく
    if (((i+1) % 2) === 0) {
        v.classList.add('even'); //偶数
    } else {
        v.classList.add('odd'); //奇数
    }

});

</script>
サンプルコード
以下は、
「実行」ボタンをクリックすると、奇数・偶数に分けてクラスを付与する
サンプルコードとなります。
※cssには「tailwind」を使用してます。関数はアロー関数を使用してます。
<!DOCTYPE html>
<html lang="ja">

<head>
  <meta charset="utf-8" />
  <title>mebeeサンプル</title>
  <meta name="viewport" content="width=device-width, initial-scale=1.0">
  <script src="https://cdn.tailwindcss.com"></script>
</head>

<body>
  <div class="container mx-auto my-56 w-56 px-4">
    <div class="flex justify-center">
      <ul class="list-disc">
        <li>one</li>
        <li>two</li>
        <li>three</li>
        <li>four</li>
        <li>five</li>
      </ul>
    </div>

    <div class="flex justify-center">
      <button id="btn" type="button"
        class="mt-5 bg-transparent border border-red-500 hover:border-red-300 text-red-500 hover:text-red-300 font-bold py-2 px-4 rounded-full">
        実行
      </button>
    </div>
  </div>
  <script>

    // クリックイベントを登録
    btn.onclick = () => {

      // 要素を取得
      const elm = document.getElementsByTagName('li');

      // HTMLCollection(5) [li, li, li, li, li]
      console.log(elm);

      // 配列化して使用
      [...elm].forEach(function(v, i){

          // iが0から開始されるので+1しておく
          (((i+1) % 2) === 0) ? v.classList.add('text-red-300') : v.classList.add('text-blue-300');

      });

    }; // document.getElementById('btn');を省略

  </script>

</body>

</html>
クラスが付与されていることが確認できます。
-
前の記事

Ruby 配列内の最小値と最大値の両方のインデックス番号を取得する 2022.08.19
-
次の記事

SourceTreeでブランチを別のブランチにコピーする 2022.08.19