Nuxt.js WebApiをaxiosと@nuxtjs/proxyを使って取得する
nuxt.jsで、クロスオリジンリソース( Cross-Origin Resource )を共有するための解決策である@nuxtjs/proxyの簡単な利用手順
環境
- OS ubuntu19.10
- node v12.13.0
- npm 6.12.1
- Nuxt.js v2.10.2
nuxt.js環境構築
proxy-testという名前でプロジェクトを作成してます。
npx create-nuxt-app proxy-testBuefyとAxiosを選択してます。
Project name proxy-test
? Project description My fantastic Nuxt.js project
? Author name taro
? Choose the package manager Yarn
? Choose UI framework Buefy
? Choose custom server framework None (Recommended)
? Choose Nuxt.js modules Axios
? Choose linting tools (Press <space> to select, <a> to toggle all, <i> to invert selection)
? Choose test framework None
? Choose rendering mode Universal (SSR)
? Choose development tools (Press <space> to select, <a> to toggle all, <i> to invert selection)
ディレクトリ移動
cd proxy-test@nuxtjs/proxyインストール
@nuxtjs/proxyをインストールします
npm install @nuxtjs/proxy --savenuxt.config.jsのmodulesを編集します。
modules: [
    // Doc: https://buefy.github.io/#/documentation
    'nuxt-buefy',
    // Doc: https://axios.nuxtjs.org/usage
    '@nuxtjs/axios',
    '@nuxtjs/proxy'
],今回は、こちらからjsonを取得するので、axiosとproxyも下記のように編集します。
axios: {
    prefix: '/todos',
  },
  proxy: {
    '/todos': {
      target: 'https://jsonplaceholder.typicode.com',
      pathRewrite: {
        '^/todos': '/'
      }
    }
  },
@nuxtjs/proxyの使い方
layouts配下のdefault.vueのscriptタグ内を下記のとおりに編集します
<script>
export default {
data () {
return {
items: [
{
title: 'Home',
icon: 'home',
to: { name: 'index' }
},
{
title: 'Api',
icon: 'lightbulb',
to: { name: 'api' }
}
]
}
}
}
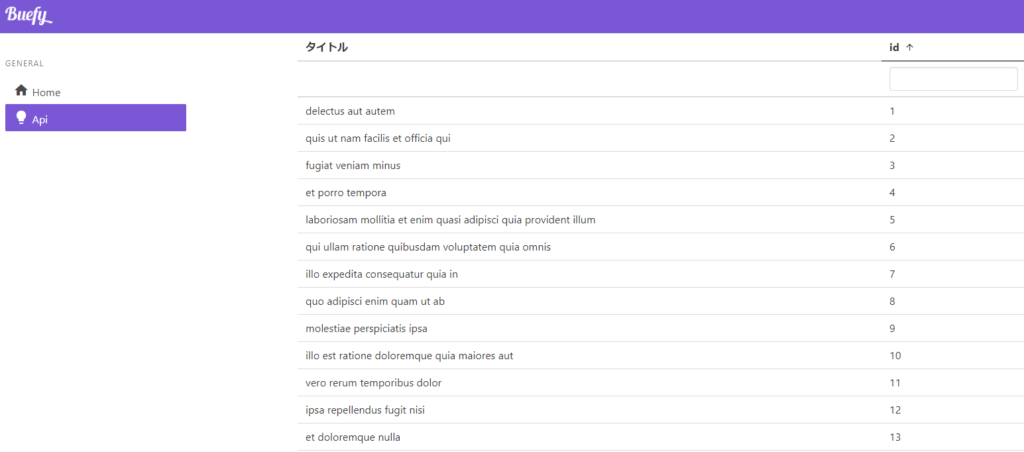
</script>pages配下にapi.vueというファイルを作成して、下記のように編集します。
<template>
<section class="container">
<div>
<b-table
:data="lists"
:default-sort-direction="defaultSortDirection"
:sort-icon="sortIcon"
:columns="columns">
</b-table>
</div>
</section>
</template>
<script>
export default {
data () {
return {
columns: [
{
field: 'title',
align: 'left',
sortable: true,
label: 'タイトル'
},
{
field: 'id',
searchable: true,
sortable: true,
label: 'id'
},
{
field: 'completed',
label: '完了'
},
],
}
},
async asyncData({ app }) {
//エンドポイントを設定
const baseUrl = '/todos';
const response = await app.$axios.$get(baseUrl);
return { lists: response };
}
}
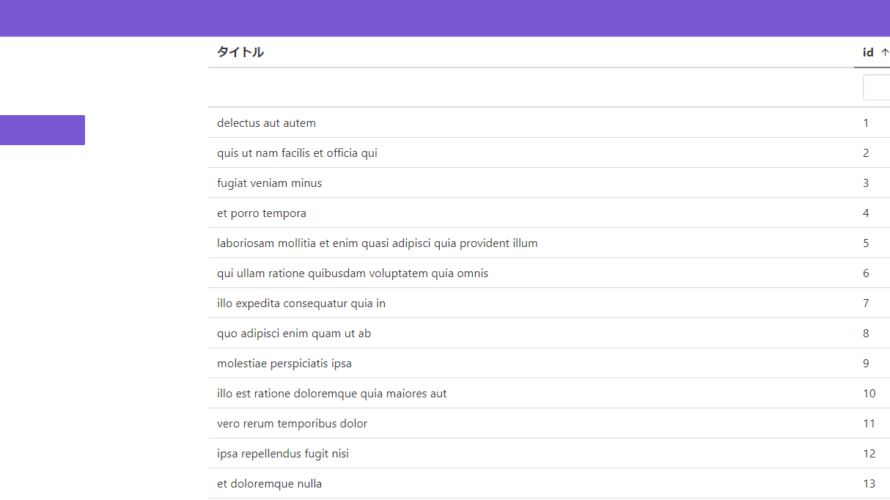
</script>ブラウザから http://プライベートIP:3000/api にアクセスするとproxyを利用してApiが取得されていることが確認できます。
-
前の記事
Vue.js vue-event-calendarをインストールしてカレンダーにイベントを追加する 2020.02.05
-
次の記事

Vue.js vue-email-dropdownをインストールしてmailアドレスのドメインをAutocompleteする手順 2020.02.06