Vue.js Vue-Tree-Chartを利用してデータをツリーチャートで表示する
- 作成日 2020.01.15
- 更新日 2020.07.21
- Vue.js
- Vue-Tree-Chart, Vue.js
tree-chartが簡単に実装できるVue-Tree-Chartを利用した簡単なサンプルコード
環境
- OS CentOS 8.0.1905 (Core)
- node v12.13.1
- npm 6.13.2
- @vue/cli 4.1.1
Vue.js環境構築
今回はvueapp1という名前でプロジェクトを作成してます。
npx vue create vueapp1

<出力結果>
Vue CLI v4.1.1
? Please pick a preset: default (babel, eslint)


Vue CLI v4.1.1
✨  Creating project in /home/testuser/vueapp1.
🗃  Initializing git repository...
⚙  Installing CLI plugins. This might take a while...
Vue-Tree-Chartインストール
Vue-Tree-Chartをインストールします。
npm i vue-tree-chart --saveVue-Tree-Chartの利用
vue-tree-chartを利用するための簡単サンプルコードとなります。
こちらの公式を参考にしてます。
src配下のapp.vueに下記のコードを記述します。
<template>
<div id="app">
<TreeChart :json="treeData" />
</div>
</template>
<script>
import Vue from 'vue'
import TreeChart from "vue-tree-chart";
Vue.component('tree-chart',TreeChart);
export default {
name: 'app',
components: {
TreeChart
},
data() {
return {
landscape: [],
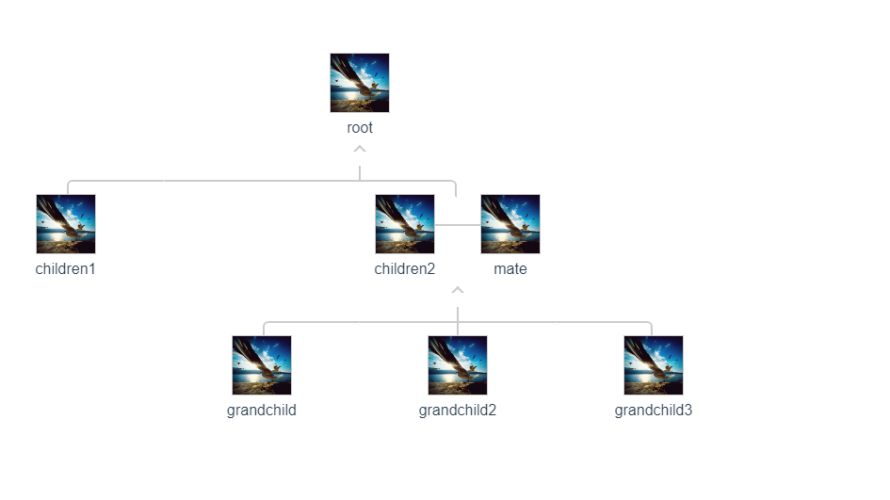
treeData: {
name: 'root',
image_url: "https://static.refined-x.com/static/avatar.jpg",
children: [
{
name: 'children1',
image_url: "https://static.refined-x.com/static/avatar.jpg"
},
{
name: 'children2',
image_url: "https://static.refined-x.com/static/avatar.jpg",
mate: {
name: 'mate',
image_url: "https://static.refined-x.com/static/avatar.jpg"
},
children: [
{
name: 'grandchild',
image_url: "https://static.refined-x.com/static/avatar.jpg"
},
{
name: 'grandchild2',
image_url: "https://static.refined-x.com/static/avatar.jpg"
},
{
name: 'grandchild3',
image_url: "https://static.refined-x.com/static/avatar.jpg"
}
]
}
]
}
}
},
}
</script>
<style>
#app {
font-family: 'Avenir', Helvetica, Arial, sans-serif;
-webkit-font-smoothing: antialiased;
-moz-osx-font-smoothing: grayscale;
text-align: center;
color: #2c3e50;
margin-top: 60px;
}
</style>ブラウザから http://プライベートIP:8080 にアクセスするとtree-chartが実現されていることが確認できます。

-
前の記事
sakuraエディタ ファルダパスとファイル名を一括取得 2020.01.15
-
次の記事

webpack-dev-serverを利用時にnpm run dev 外部IP(プライベートIP)の利用手順 2020.01.16