Nuxt.js vuex-persistedstateを使ってLocal Storageにデータを保存する
- 作成日 2019.12.25
- 更新日 2020.07.21
- nuxt.js Vuetify
- Local Storage, nuxt.js, vuex-persistedstate
vuex-persistedstateの簡単な使い方のサンプルコードです。入力したテキストとカウンターにより増加させた数値をLocal Storageに保存します。
環境
- OS Ubuntu19.10
- node v12.13.0
- npm 6.12.1
- Nuxt.js v2.10.2
vuex-persistedstateインストール
まずはvuex-persistedstateをインストールします。
npm install vuex-persistedstatevuetifyインストール
UIコンポーネントフレームワークで vuetify も利用するのでインストールしておく。
npm install @nuxtjs/vuetifyプロジェクト配下にあるnuxt.config.jsを編集しておきます。
modules: [
    '@nuxtjs/vuetify'
  ],
  vuetify: {
    theme: {
      primary: '#3f51b5',
      secondary: '#b0bec5',
      accent: '#8c9eff',
      error: '#b71c1c'
    }
  }
vuex-persistedstateの使い方
plugins配下にlocalStorage.jsという名前でファイルを作成して、下記のコードを記述します。
import createPersistedState from 'vuex-persistedstate'

export default ({ store }) => {

    window.onNuxtReady(() => {
        createPersistedState({
            key: 'test-key'
        })(store)
    })
}
次にnuxt.config.jsのplugins:に下記のコードを追加して設定します。
plugins: [
    { src: '@/plugins/localStorage',
      ssr: false
    },
  ],
store配下にindex.jsという名前でファイルを作成して、下記のコードを記述します。
export const state = () => ({
    text: '',
    count: 0
})

export const mutations = {
    increment(state) {
        state.count += 1
    },
    changText(state, text) {
        state.text = text
    }
}
後はpages配下に、test.vueという名前で下記のコードを記述します。
※デザインには vuetify を利用してます。
<template>
<v-app id="inspire">
  <v-container>
    <v-row dense>
      <v-col cols="12">
        <v-card class="pa-md-4 mx-lg-auto" color="white" width="250px">
          <p class="text-uppercase">テキストを入力</p>
          <v-text-field v-bind:label="'前回の入力値:' + $store.state.text" single-line v-model="text"></v-text-field>
          <v-card-actions>
            <v-btn depressed small color="primary" @click="changText">テキストを保存する</v-btn>
          </v-card-actions>
        </v-card>
      </v-col>
      <v-col cols="12">
        <v-card class="pa-md-4 mx-lg-auto" color="white" width="250px">
          <p class="text-uppercase">カウント : {{ $store.state.count }}</p>
          <v-card-actions>
            <v-btn depressed small color="error" @click="counter">カウントを追加<v-icon dark>mdi-plus</v-icon></v-btn>
          </v-card-actions>
        </v-card>
      </v-col>
      <v-col cols="12">
        <v-card class="pa-md-4 mx-lg-auto" color="white" width="250px">
          <v-btn depressed small onclick="window.location.reload();">reload</v-btn>
          <v-btn depressed small @click="clearText">clear</v-btn>
        </v-card>
      </v-col>
    </v-row>
  </v-container>
</v-app>
</template>

<script>
export default {
  data() {
    return {
      text: ""
    };
  },
  methods: {
    counter() {
      this.$store.commit("increment");
    },
    changText() {
      this.$store.commit("changText", this.text);
    },
    clearText() {
      localStorage.clear();
    }
  }
};
</script>
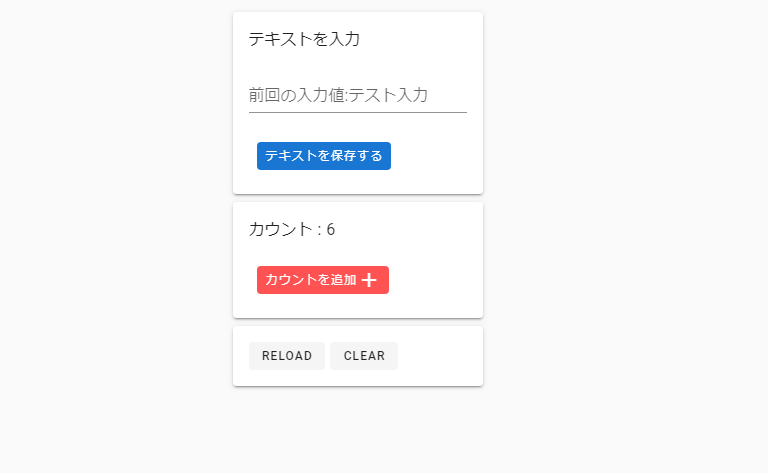
ブラウザから http://プライベートIP:3000/testにアクセスすると、下記の画面が表示され、テキストを保存ボタンをクリックすると、入力したテキストが保存され、カウンターを追加ボタンをクリックするとカウンターの数値が増加し、値がリロードしても、保存されることが確認できます。
-
前の記事
Python kivyをインストールして利用してみる 2019.12.25
-
次の記事
Nuxt.jsで実装したWebサイトをNetlifyにデプロイする手順 2019.12.25