Vue.js Vue.Draggableを利用してドラッグ&ドロップを実装するサンプルコード
- 作成日 2019.12.03
- 更新日 2022.06.29
- Vue.js
- Vue.Draggable, Vue.js
ドラッグ&ドロップをお手軽に実装できるvue.jsコンポートネントライブラリ「 Vue.Draggable( SortableJS のvue版 )」を利用したサンプルコードです。
環境
- OS ubuntu19.10
- node v12.13.0
- npm 6.12.1
- vuedraggable 2.23.2
Vue.js環境構築
今回、構築した手順です。
## test-projectという名前で作成
npx vue create test-project
cd test-project
Vue.Draggableのインストール
vue.draggableをインストールします。
npm i -S vuedraggableこれで vue.draggable が利用できます。
サンプルコード
vue.draggable を利用したサンプルコードとなります。
src配下のApp.vueを下記のように編集します。
<template>
  <div id="app">
    <draggable v-model="list" element="ul" :options="{animation:500}">
      <li v-for="item in list" :key="item.id">{{ item.name }}</li>
    </draggable>
  </div>
</template>

<script>
import draggable from "vuedraggable";
export default {
  components: {
    draggable
  },
  data() {
    return {
      list: [
        { id: 1, name: "java" },
        { id: 2, name: "c#" },
        { id: 3, name: "go" },
        { id: 4, name: "c++" },
        { id: 5, name: "vba" },
        { id: 6, name: "electron" },
        { id: 7, name: "vue.js" },
      ]
    };
  }
};
</script>

<style>
#app {
    font-family: 'Avenir', Helvetica, Arial, sans-serif;
    -webkit-font-smoothing: antialiased;
    -moz-osx-font-smoothing: grayscale;
    color: #2c3e50;
    margin-top: 120px;
    width: 300px;
    margin:  0 auto;
}
ul {
  padding: 0;
  position: relative;
}
li {
  color: black;
  border-left: solid 8px #37b507;
  background: whitesmoke;
  margin-bottom: 5px;
  line-height: 1.5;
  border-radius: 0 15px 15px 0;
  padding: 0.5em;
  list-style-type: none!important;
}
</style>
起動します。
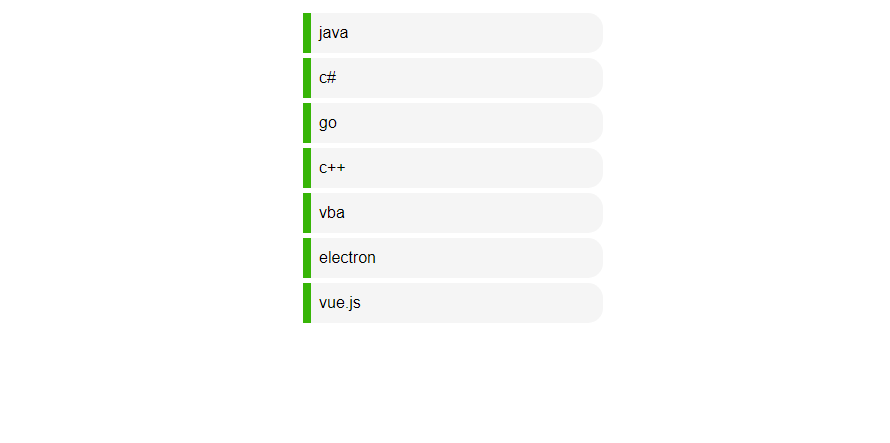
yarn serveブラウザから http://プライベートIP:8080 にアクセスすると下図の画面が表示され、ドラック&ドロップが可能になります。
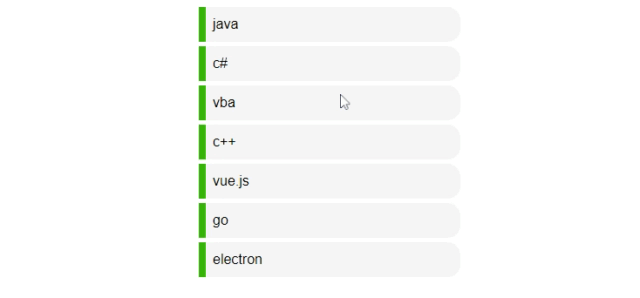
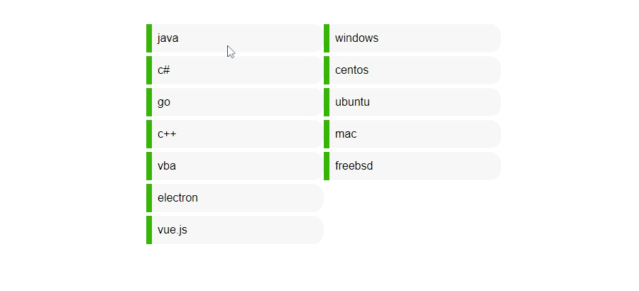
複数箇所からドラック&ドロップ させる場合は、下記のコードとなります。
<template>
  <div id="app">
    <div class="box">
      <draggable v-model="list" element="ul" :options="{group:'ITEMS',animation:500}">
        <li v-for="item in list" :key="item.id">{{ item.name }}</li>
      </draggable>
    </div>
    <div class="box">
      <draggable v-model="list2" element="ul" :options="{group:'ITEMS',animation:500}">
        <li v-for="item in list2" :key="item.id">{{ item.name }}</li>
      </draggable>
    </div>
  </div>
</template>

<script>
import draggable from "vuedraggable";
export default {
  components: {
    draggable
  },
  data() {
    return {
      list: [
        { id: 1, name: "java" },
        { id: 2, name: "c#" },
        { id: 3, name: "go" },
        { id: 4, name: "c++" },
        { id: 5, name: "vba" },
        { id: 6, name: "electron" },
        { id: 7, name: "vue.js" },
      ],
      list2: [
        { id: 1, name: "windows" },
        { id: 2, name: "centos" },
        { id: 3, name: "ubuntu" },
        { id: 4, name: "mac" },
        { id: 5, name: "freebsd" }
      ]
    };
  }
};
</script>

<style>
#app {
    font-family: 'Avenir', Helvetica, Arial, sans-serif;
    -webkit-font-smoothing: antialiased;
    -moz-osx-font-smoothing: grayscale;
    color: #2c3e50;
    margin-top: 120px;
    width: 500px;
    margin:  0 auto;
}
.box {
  width: 50%;
  float: left;
  padding: 20px 0;
}
ul {
  padding: 0;
  position: relative;
}
li {
  color: black;
  border-left: solid 8px #37b507;
  background: whitesmoke;
  margin-bottom: 5px;
  line-height: 1.5;
  border-radius: 0 15px 15px 0;
  padding: 0.5em;
  list-style-type: none!important;
}
</style>
ブラウザから http://プライベートIP:8008 にアクセスすると下図のようになります。
-
前の記事

Ubuntu19.10にelasticsearchをインストールする 2019.12.03
-
次の記事
windows10 proにDockerでNextcloudを構築して試してみる 2019.12.04