CentOs8へgulp.js導入手順

作業を自動化してくれるタスクランナー 「gulp.js(ガルプ)」の導入手順です
環境
- OS CentOS Linux release 8.0.1905 (Core)
- node V10.16.3
- npm 6.9.0
- gulp 4.0.2
- gulp-sass 4.0.2
※centos8にnodeのインストール手順はこちら
gulp.jsとは
タスクランナー 「gulp.js(ガルプ)」 はファイルの保存時などに、圧縮やSassへのコンパイル等を自動で行ってくれるツールです
package.jsonの作成
下記の手順でpackage.jsonを作成します
## 作業フォルダ作成
mkdir gulp-test

## 移動
cd gulp-test

## package.jsonを作成
npm init

<出力結果>
全てENTERキー押下で作成

This utility will walk you through creating a package.json file.
It only covers the most common items, and tries to guess sensible defaults.

See `npm help json` for definitive documentation on these fields
and exactly what they do.

Use `npm install <pkg>` afterwards to install a package and
save it as a dependency in the package.json file.

Press ^C at any time to quit.
package name: (gulp-test)
version: (1.0.0)
description:
entry point: (index.js)
test command:
git repository:
keywords:
author:
license: (ISC)
About to write to /home/testuser/gulp-test/package.json:

{
  "name": "gulp-test",
  "version": "1.0.0",
  "description": "",
  "main": "index.js",
  "scripts": {
    "test": "echo \"Error: no test specified\" && exit 1"
  },
  "author": "",
  "license": "ISC"
}


Is this OK? (yes)
プロジェクトの設定情報などが書かれた package.json が生成されます
Gulpのインストール
Gulpをローカルインストールします
## 今回利用するプラグインgulp-sassもインストール
npm i -D gulp gulp-sassローカルインストールとグローバルインストールについてはこちら
gulpfile.jsの作成
gulpを利用するためのgulpfile.jsを作成する。 package.jsonと同じ階層に作成して下さい
## 作成
touch gulpfile.js
SassをGulpでコンパイル してみる
scss/test.scss をコンパイルして、test.css を トップディレクトリー に生成する
まずは、scssディレクトリを作成する
mkdir scsstest.scssをviで作成して、編集する
## 編集
vi scss/test.scss
test.scssを下記の内容で作成する
#main{
    background-color:#000;
    .content{
        background-color:#aaa;
        color:#000;
        .sidebar{
            padding:10px;
        }
    }
}
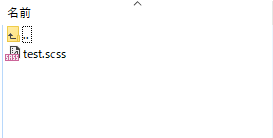
参考 ディレクトリ構成
topディレクトリ
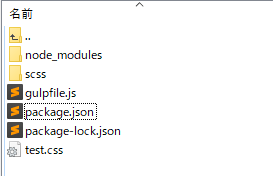
scssディレクトリ
gulpfile.jsの編集
gulpfile.jsを下記の内容で編集し、タスクを実行する
// gulpプラグイン読み込み
const gulp = require("gulp");
// gulp-sassプラグイン読み込み
const sass = require("gulp-sass");

// タスクを作成する
gulp.task("default", function() {
  return (
    gulp
      // test.scss取得
      .src("scss/test.scss")
      // Sassのコンパイル実行
      .pipe(
        sass({
         // 後述
          outputStyle: "expanded"
        })
      )
      // topディレクトリー に生成
      .pipe(gulp.dest("./"))
  );
});
outputStyle:各スタイルについて
下記のscssがコンパイルされた場合の各スタイル
body {
  color: #fff;
  h1 {
    color: #000;
  }
}
nested
body {
  color: #fff; }
  body h1 {
    color: #000; }
expanded
body {
  color: #fff;
}

body h1 {
  color: #000;
}
compact
body { color: #fff; }

body h1 { color: #000; }
compressed
body{color:#fff}body h1{color:#000}タスクの実行
下記のコマンドでタスクの実行が可能
sudo npx gulptop ディレクトリにtest.cssが下記の内容で生成される
#main {
  background-color: #000;
}

#main .content {
  background-color: #aaa;
  color: #000;
}

#main .content .sidebar {
  padding: 10px;
}
ファイル変更時に自動でタスクを実行させる
test.scssが編集されると、自動的にtest.cssが生成され、圧縮された.min.cssが生成されるように gulpfile.jsを編集する
プラグイン追加
CSSの圧縮とリネームを行うプラグインを追加する
npm i -D gulp-rename gulp-clean-cssgulpfile.jsを編集する
// gulpプラグイン読み込み
const gulp = require("gulp");
// gulp-sassプラグイン読み込み
const sass = require("gulp-sass");
// gulp-renameプラグイン読み込み
var rename = require('gulp-rename');
// gulp-clean-cssプラグイン読み込み
var cleanCSS = require('gulp-clean-css');

// Sassをコンパイルするタスクの設定
gulp.task("css", function () {
	// scssディレクトリ内全てのファイル
    return gulp.src('scss/*.scss')
    		//コンパイル実行
            .pipe(sass())
            .pipe(sass({outputStyle: "expanded"}))
            // topディレクトリー に生成
            .pipe(gulp.dest('./'));
});

// .min.cssを生成するタスクの設定
gulp.task("mincss", function () {
	//cssタスクで生成したcssファイル
    return gulp.src('./*.css')
    		// 圧縮
            .pipe(cleanCSS())
            // リネームする
            .pipe(rename({extname:'.min.css'}))
            // topディレクトリー に生成
            .pipe(gulp.dest('./'));
});

gulp.task("default", function () {
    // scssフォルダの全てのscssが変更されるとコンパイルが実行される
    gulp.watch('scss/*.scss',gulp.series('css', 'mincss'));
});
監視開始
## 実行
sudo npx gulp

<出力結果>
[13:08:11] Using gulpfile /home/testuser/gulp-test/gulpfile.js
[13:08:11] Starting 'default'...
scss/test.scssを編集してみる。カラーを全てfffに変更
#main{
    background-color:#fff;
    .content{
        background-color:#fff;
        color:#fff;
        .sidebar{
            padding:10px;
        }
    }
}
test.cssも全て#fffに変更されて、圧縮されたtest.min.cssが生成される
#main {
  background-color: #fff;
}

#main .content {
  background-color: #fff;
  color: #fff;
}

#main .content .sidebar {
  padding: 10px;
}
test.min.css も圧縮されている
#main{background-color:#fff}#main .content{background-color:#fff;color:#fff}#main .content .sidebar{padding:10px}gulp プラグインは、検索すればたくさんでてきますので、活用してみて下さい
-
前の記事

CentOs7 lsofコマンドを利用できるようにする 2019.10.29
-
次の記事

CentOs8にEslintの導入手順 2019.10.29






コメントを書く